
Last year I pattern-tested the Karri dress by Megan Nielsen (or at least I did but a bit after the event) I enjoyed the process because I just love and am fascinated by garment construction so the chance to be in at the beginning of a pattern coming to market is great. When I got an email last autumn requesting testers for a new jeans pattern from Megan Nielsen I was really keen to give them a go because I haven’t made jeans before and, this time round, the timing worked for me because I’d finished all my major bridal alterations for the summer and could concentrate on my own projects.
Initially there was a slight delay due to some technical issues before the pattern was released to testers so in the interim I’d bought a quantity of black stretch denim from Backstitch near Cambridge which I hoped would be enough-I guesstimated at 2m based on other jeans patterns I’d seen.
When the pattern arrived it had even more options than we were told it would have originally-there were skinny, slim, flared and wide-leg options. The instructions are nice and clear about exactly which pages you need to print off for the options you want so that you don’t print more pages than needed. Also these days I don’t print off the making instructions, I just keep them on the laptop and read them directly off the screen, I actually find that a little easier to ‘comprehend’ them that way too, maybe it’s because the instructions and illustrations are that much larger than in print? If you have difficulty with making sense of instructions why not try this method with PDFs to see if it works for you.
After initially thinking I‘d go for the slim leg I eventually printed off the wide legged ones-I was concerned that they might be too tight on my legs (vanity) more on this later.
Ok, so I printed off the wide-leg version but they looked way too wide-I’m only average height and dumpier than I’d like to be so I didn’t want to look like Pop Eye in his matelot trousers! Rather than reprint the slim leg (stingy) I eventually folded out some of the width at hem level, fading it into nothing by the mid-thigh. One of my observations in the feedback was that the lines became quite indistinct between sizes on the waistband-I feel that they would be better ‘nested’ into groups so that there could be bigger gaps between them, it will be interesting to see if this happens. There’s a wide range of waist sizes included in the Ash so most people are quite likely to be able to use it.
The pattern was very straightforward to piece together, either I’m getting better at this process because I’ve done it a few times now or maybe the first PDFs I did were more complex anyway, this one was simple. Cue cutting, sticking and more cutting. Fortunately for me the quantity of fabric I’d bought was just enough, obviously there’s no nap to worry about on denim so the pieces can interlock well although the curved waistband is all in one piece so it just squeaked in {if it hadn’t fitted in one piece I would have cut it into two at the CB like mens trousers have, this enables a better fit and can be useful on women’s trousers too if you’re having difficulty getting a good fit into the small of your back}
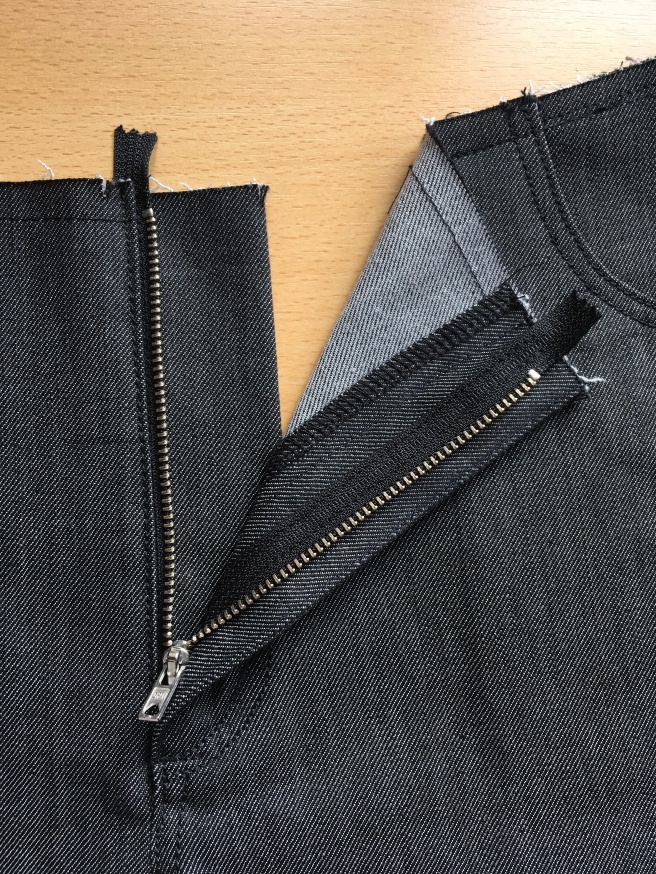
Construction starts with the zip fly. Part of the reason I wanted to try jeans is because it’s been absolutely years since I made trousers with a zip fly and I don’t remember them being a huge success!
I found the instructions very clear and meticulous with helpful diagrams, as I said earlier I followed them on the laptop so I could scroll up and down as much as I needed to so that I knew exactly what to do at each step. Ok, so this is going to sound like bragging but it really isn’t….I didn’t make a single error whilst doing this stage and I give full credit to the quality of the instructions. You could argue that’s because I know roughly what I should be doing but I don’t think that’s all it is, credit where it’s due to the writer.

After the zip is in you make the front pockets-I lined mine with a contrast fabric-and that was very straightforward. Much as I love my trusty Elna 7000 it’s getting on a bit now and really doesn’t much like topstitching thread so doing the topstitching proved frustrating and problematic. (I’ve bought a new Pfaff Quilt Ambition 2.0 since making these and I’m delighted with it) I fiddled with the tension a bit and eventually I got a decent quality stitch but it isn’t perfect on the underside. Incidentally I used a denim/jeans needle throughout (it’s just occurred to me that there are top stitch needles too so maybe I should try that next time)
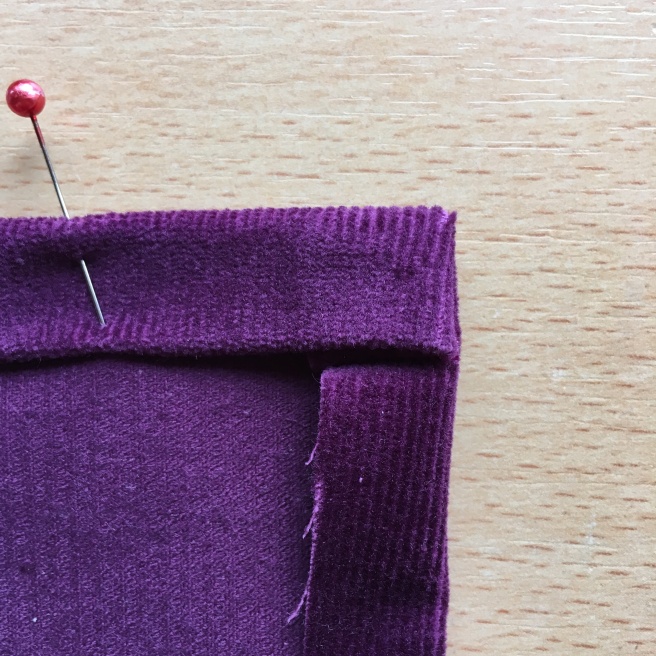
Next the patch pockets go on the back. I chose not to do any fancy stitching designs or topstitching (partly because my machine was struggling so much with the thread) and just kept it simple.

I’ve made a second pair of Ash more recently and I slightly altered the way I did the top of the pocket.


After trying the jeans on again I was still not happy with the width of the leg that I’d cut so, because the inner leg seams are double top-stitched, I skimmed in some more from the outer leg seams (this is becoming a habit, see my Love Sewing trouser pattern review here)

Eventually I got to a leg-width that I was happy with and after that it was just a case of hemming them. You might look at the finished photos and think “well they don’t fit that well” but frankly I don’t care because I’ve struggled at times in my life to feel comfortable and confident wearing jeans at all because there are so many idealised images out there of what a woman ‘ought’ to look like in them, they should be tighter here, they shouldn’t wrinkle there etc etc blah blah blah….I’m comfortable and happy in these as they are, it’s my body shape that would have to change drastically and it isn’t going to any time soon. Rant over…
Finally the waistband needs a jeans button and a buttonhole. The instructions helpfully pointed out that the buttonhole should be round-ended (not something I’d ever paid much attention to on RTW jeans) and making such a buttonhole on a domestic machine is usually very tricky because of the thickness of fabric involved. Megan suggests doing it ‘freehand’ with a zigzag stitch so I had a few practices at this. Eventually I felt brave enough to do it on the actual waistband and it turned out passably well. My new machine seems much better at buttonholes-it should do, it cost me enough!

The jeans button is the sort with a rivet or stud behind it so it’s a case of banging them together through the fabric with a hammer! Don’t do it on your best table, put it on the bread board or a towel folded several times.

I’d been trying on the jeans periodically as I went along and they felt great. Personally I’m delighted with how well Ash fit me! They are snug and comfortable around my waist and hips and I’m really really happy with them.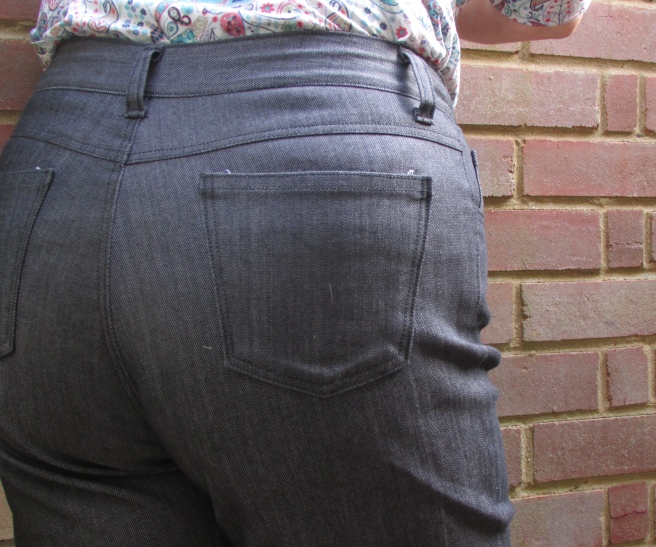


By the time you’re reading this the Ash jeans will have been released into the wild so you’ll be seeing lots of different versions of them all over the place. I’ve since bought some stretch cord and made another pair, I left the legs a bit longer and a bit wider this time. I’ve worn the denim pair constantly because they’re so comfy, the denim has just the right amount of stretch.


I liked the fit of the legs (eventually!) and because the pattern provides 4 leg shapes there’s bound to be one that you’ll like, I like the on-the-waist fit too.
If you’re looking for a new sewing challenge then jeans might be just the ticket, there was a lot of jeans-sewing going on during February and March so there is plenty of inspiration out there. They are definitely a slow-sew which you might need to break down into bite-size chunks, they need concentration at times, and a certain degree of sewing ‘comprehension’ because they aren’t for complete beginners. I felt the quality of the written instructions and diagrams was excellent and there will be online tutorials available eventually too. It’s also worth mentioning that I found 1 reel of topstitching thread isn’t quite sufficient because there’s only 30m on a regular-sized reel of Gutermann, which is what I used.
I was provided with the pattern at no cost but I bought my own fabric and received no payment for testing the Ash jeans, and as such all the opinions expressed are unbiased and entirely my own. I’ve just bought some more blue denim to make a cropped length next!
Happy sewing,
Sue

They look fabulous on you! I’m determined to make some jeans in the hope that they fit better than RTW, which are never long enough in the body. I’ll add the Ash jeans to my list of patterns to look at.
LikeLiked by 1 person
Your jeans look fantastic – what a great fit. Thanks for such a thorough review of the pattern and your process. I’m inspired to give it a try!
LikeLiked by 1 person
Your jeans look great, Sue! Thank you for such a detailed review of the pattern. I ordered the pattern this morning and I can’t wait for it to come. I have recently been shopping for a new sewing machine and the Pfaff Quilt Ambition is at the top of my list now. I’m glad to hear you’re happy with yours!
LikeLiked by 1 person
Thank you Teri, I’m glad it was helpful-good luck with choosing a new machine, I’d definitely advise trying a few out before you spend all that money!
LikeLike
Oh those do look good. I like your method for doing the pockets. I’d never seen that before but it makes a lot of sense.
LikeLiked by 1 person
It’s nice and neat isn’t it?
LikeLike
So nice! The fit looks perfect and comfy. I’d like to try jeans soon, but reluctant…no waistline etc etc keep me away. But maybe. Is this pattern less complicated than most? And I have a general question- without an overlocker, how does one finish seams on jeans?
LikeLiked by 1 person
It’s a relatively complex pattern because there are quite a few pattern pieces to deal with. If you’re not a complete beginner sewer then you should be fine (I think the online tutorials will be up very soon too) I would just zigzag if you don’t have an overlocker, the seams which have double topstitching may not need to be neatening at all because that stitching will hold the seam down and stop it fraying. You could also bias bind some of the edges if they aren’t too thick. I’m so happy with the fit, I’m not as trim as I was but these are beautifully snug (in a good way) at the back waist, often a baggy area for me. Good luck!
LikeLiked by 1 person
Thanks for such a complete response! I’ll take it to heart and get some sort of trousers going soon. I have some lovely bottomweight cotton (denim?) that I want to use – it’s reddish!
LikeLiked by 1 person