I have woefully neglected the blog in the last 12 months and I’ve decided the Reeta dress from Named was the pattern to change that because, hopefully, I can offer some advice on sewing it.
It’s been a popular pattern ever since it was first released in 2017 and is a modern take on the classic shirt-waister styles by Finnish brand, Named. All the reviews agree it’s a really nice style which looks great but the one thing they all seem to comment on is the ’tricky’ or ‘confusing’ construction methods used. I’ve fancied making a Reeta for a while so I thought I ought to give it a go and to be ready for the pitfalls and to pass on anything I learn from the experience to you, dear reader.
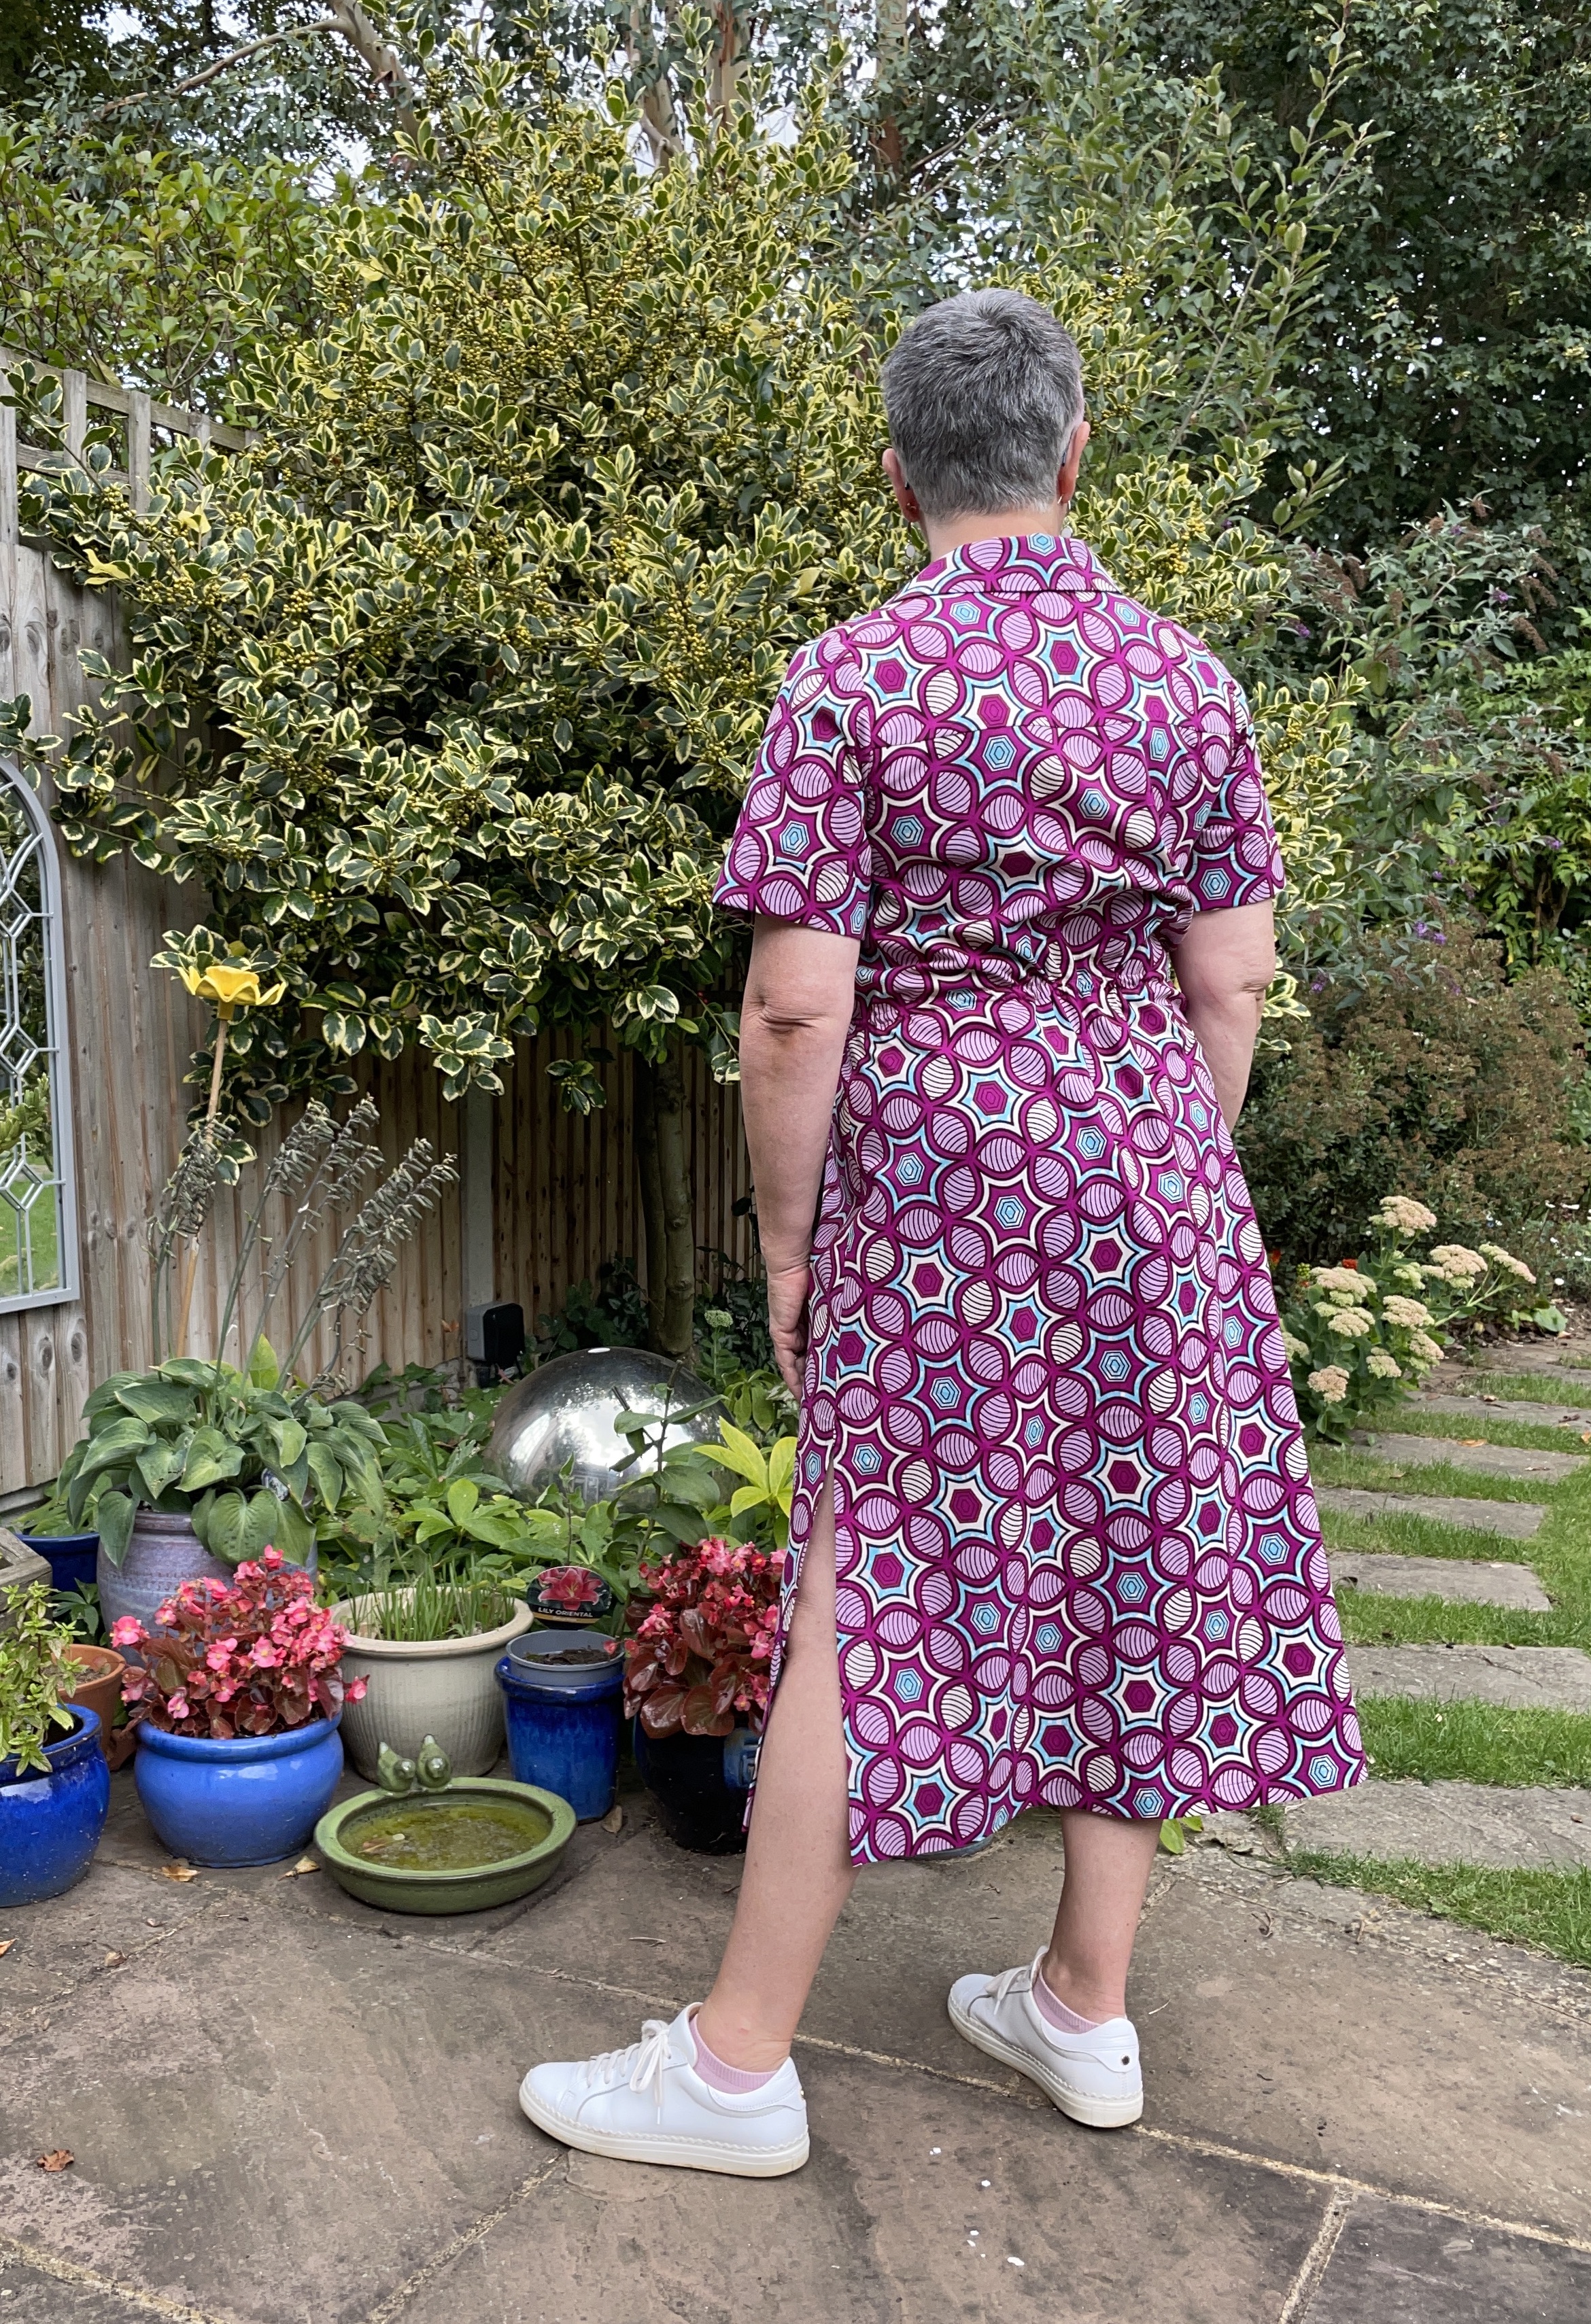
I had 3 metres of purple/pink/turquoise Ankara fabric which I had picked up from the swap at the Sew Sustainable fair in London back in January. I had anticipated using it for something buffet-dress wafty style but, so long as I could cut it out with acceptable-not-necessarily-brilliant pattern matching, then the Reeta might be a nice alternative..
I traced off the size 42 based on my body measurements, unfortunately I was kidding myself because the 44 would have given me more wiggle room over the bust, the waist and hips were fine. It isn’t the end of the world, this time I took a smaller seam allowance (it’s only 1cm to start with, eek!!) I’ve added extra to the bodice pattern for next time though. One thing a lot of reviewers also remark on is the length, it’s designed for a woman of 5’8” so I removed 10cms from the length before I started (more on this later)
As the area people seem to have the trouble with is the yoke and facings I will concentrate on those. Maybe it’s the fact that the collar is also enclosed within the burrito is what makes it unusual, on shirts the collar is more often added after the yoke section is completed. Because the collar goes on early it means that the neck seams all become enclosed which gives a lovely neat finish inside.
It certainly helps if you are already familiar with the Burrito method because that will definitely help you get your head around what is happening here. My strongest piece of advice is to read through the instructions for the whole collar/yoke/front facing instructions (points 6 through to 11) several times first, use a highlighter pen on key words or phrases if necessary. Look really carefully at the diagrams too because there are a couple of times where it could be easy to rush ahead based on assumptions of how you might have sewn these areas on other patterns. The diagrams have all the information you need, expand them on screen or print those pages a bit larger if you need to so that you can see the stitching lines clearly.
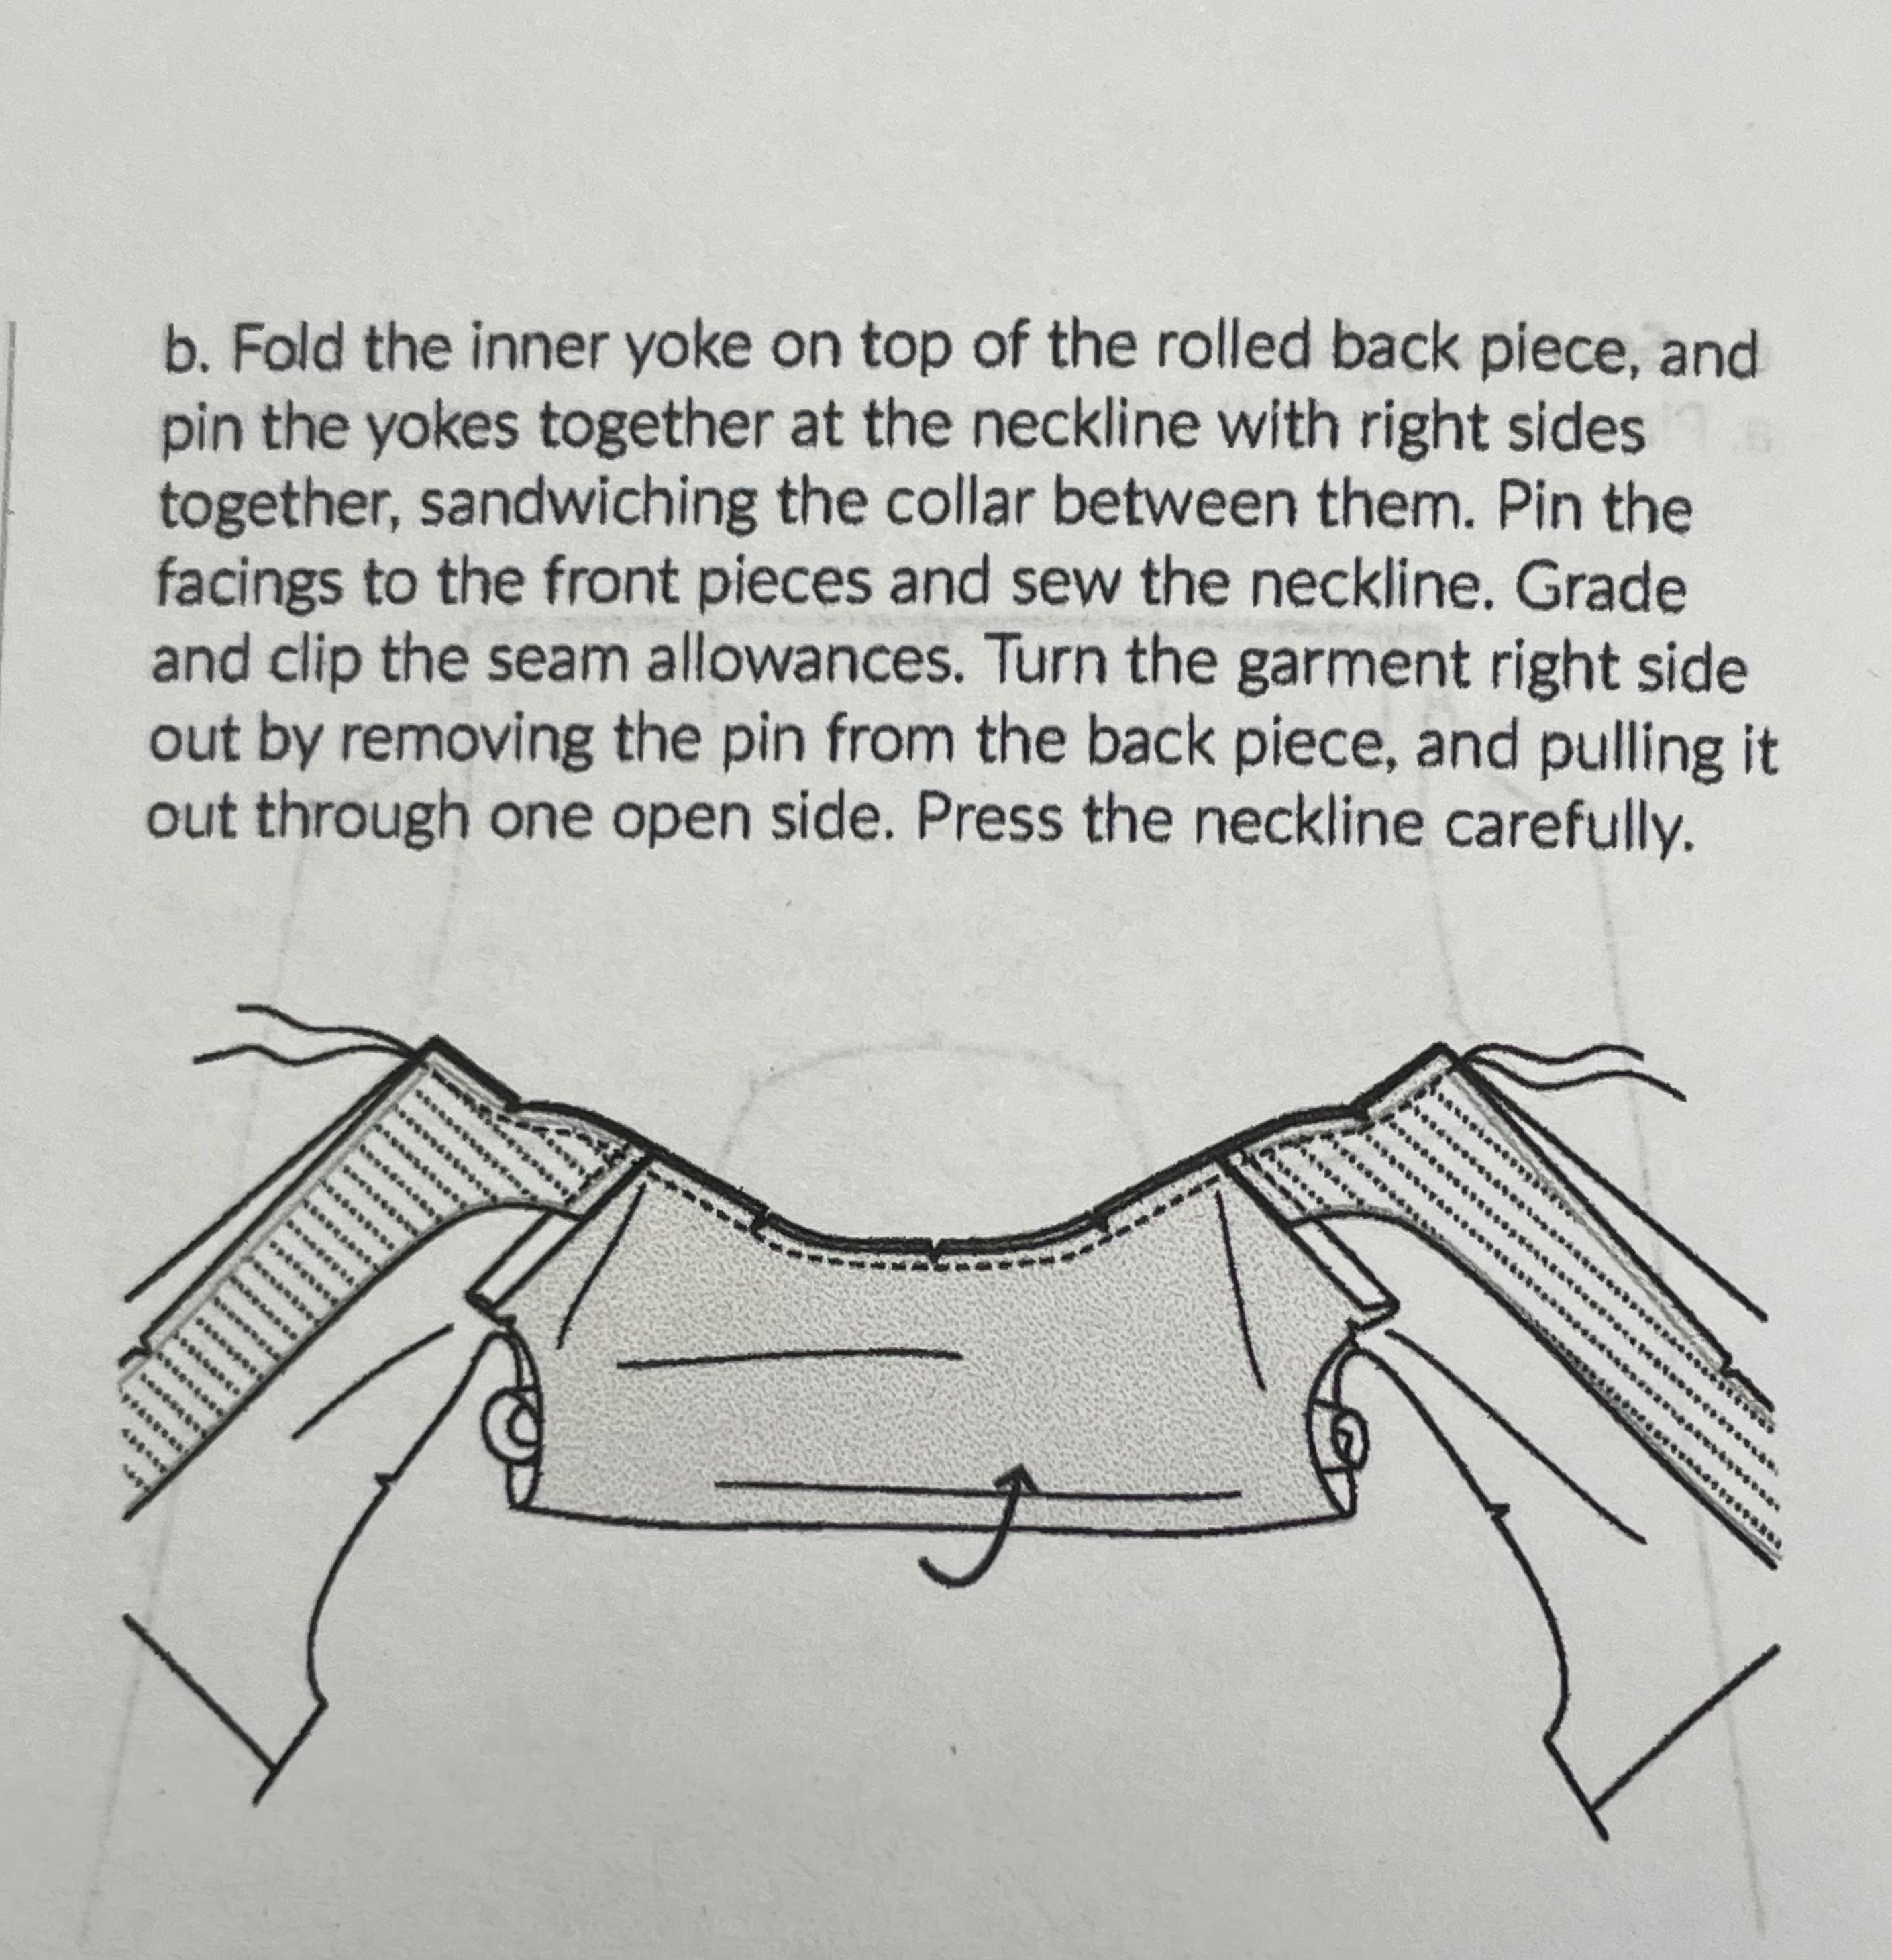
First attach the inner and outer yoke pieces to the dress back as per the instructions. Next, the long front facings get attached to the inner yoke shoulder seam then all the yokes and collar are rolled up inside the burrito, point 8b is important and I wonder if this could be where some people have started to come unstuck in the past, you’re only sewing the collar and neck edge not down the front facings as well at this stage. Pull everything through and complete the rest of the yoke at the shoulder seams now, there seems to be a fixation with sewing everything on the machine, this makes me cross and is not essential! If it means you get a more accurate and neater finish then for goodness sake slip hem the remaining edges by hand! Or at least tack (baste) them in position to stitch in the ditch and not just rely on pinning (and what’s with this obsession of using a million pins to hold something in place? just tack it! Tacking/basting seems to have become a dirty word and it’s usually more reliable than pins in tricky or hard to get at areas.)
This is what the finish inside the collar will look like, the seams are all neatly enclosed, I used plain cotton lawn for the inner yoke.
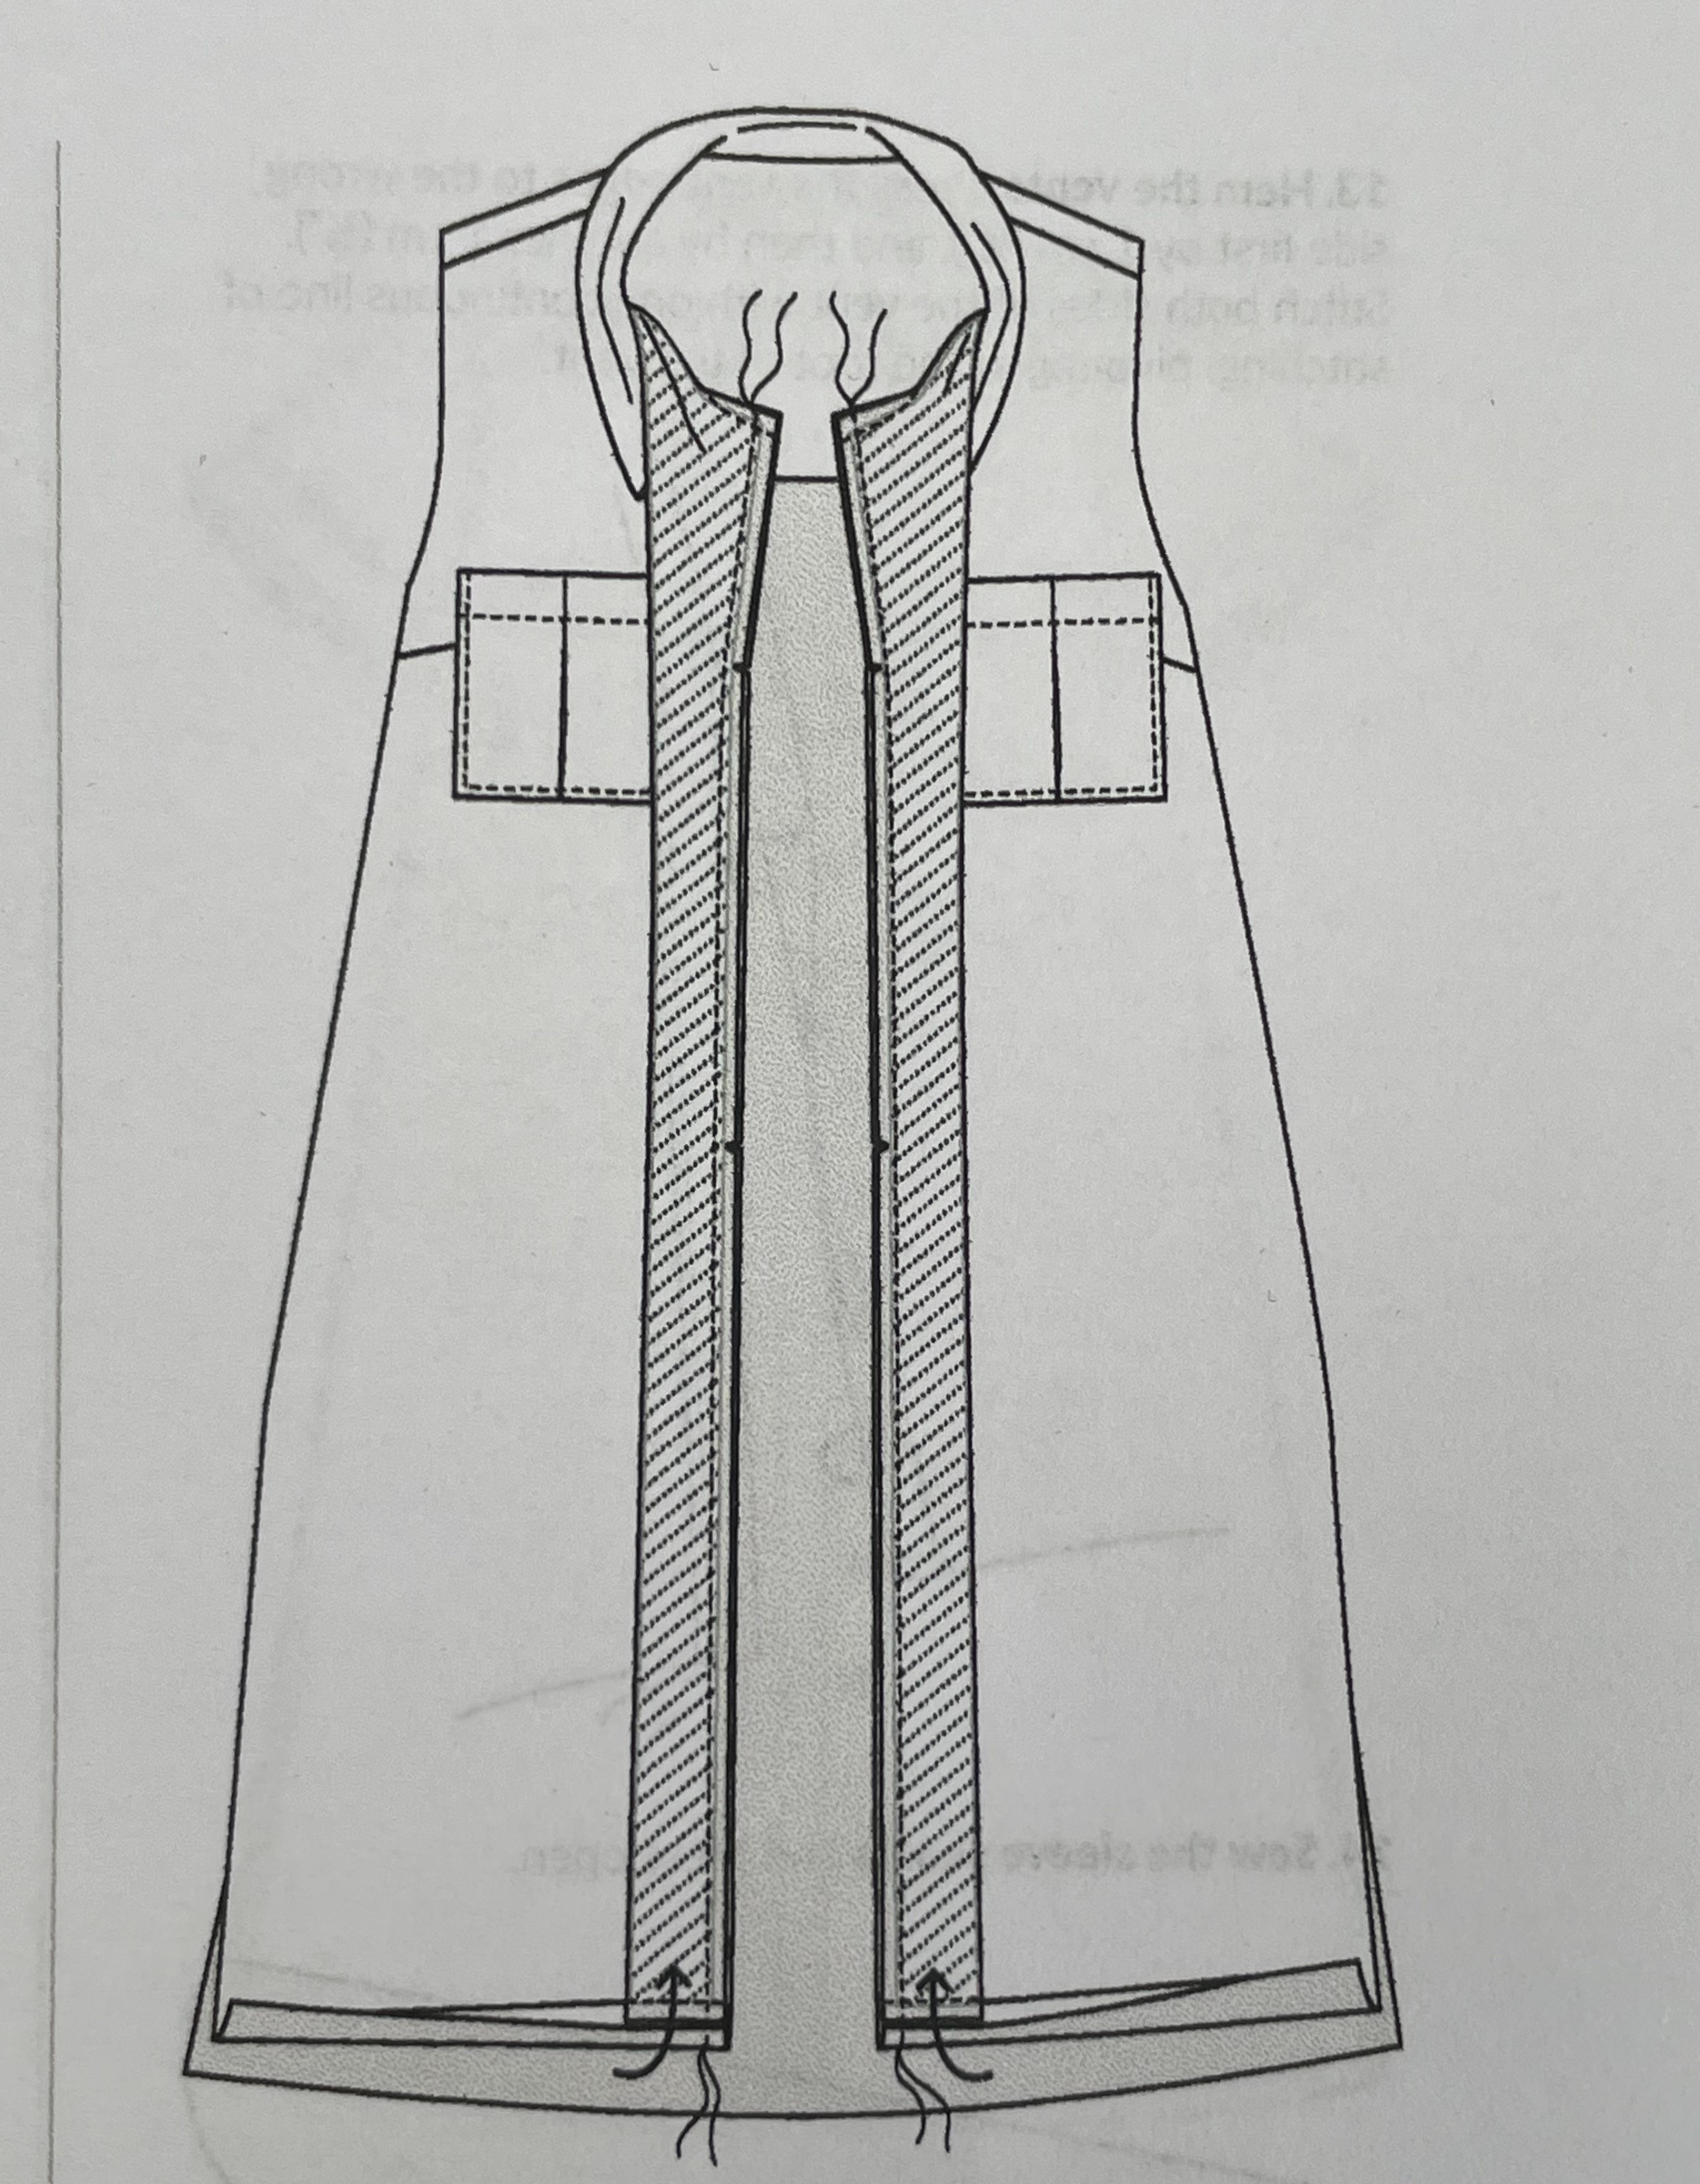
Once the yoke is complete step 10 might catch you out. Initially only sew the short lower edge of the front facings to the dress hem, the facings themselves are slightly shorter than the front of the dress which causes the hem itself to turn naturally upwards. Now sew the long edges of the facings to the shell of the dress securing the hem in its upward facing position. I hadn’t encountered this technique before but it certainly gives a nice neat turn-up at the hem.
This diagram shows the hem is already slightly turned up when the rest of the front facings are sewn on
The rest of the construction proceeded much as I would expect, the pattern fitted together very well with notches matching and the rest of the instructions were pretty clear. I mentioned earlier that I shortened the pattern by 10cms but once it was finished I think I had shortened it little too much, next time I’ll add 5cms back on. Also, having worn it for a day I think the position of the waistline casing is slightly too high on me so I will move that downwards by 3-5cms.
I sewed on a couple of fabric tags to neaten the ends of the waist tape. You can’t quite see them but I made round-ended buttonholes for the tape to go through.These are actual turn-up cuffs on the sleeves so I’m pretty happy with how well they match!I bought the buttons from Textile Garden and used one of my favourite tricks of mixing two colours and sewing the buttonholes with contrasting threads. I accidentally badly mismatched the print on one of the breast pockets but fortunately I had just enough fabric left to cut another. There is an inverted pleat in the pocket so I opted to only match the front and centre edges (and one of them still isn’t right but I’m not going to point that out to you!) better done than perfect!I am happy with the finished dress and I love the fabric but I’m just not sure if it doesn’t looks like a jazzy nurses uniform on me!? I definitely shan’t be making it in plain fabric for that reason though….oooh Matron!The side splits add interest but of course you don’t have to include those.I think I’ll use the spare non-matching pocket on the skirt if I can find a suitable matching spot for it, I missed having lower down pockets while I was wearing it [you could easily add side seam pockets though, I won’t bother with that]
I’ve written this review because I know so many have got into a pickle with the instructions, hopefully this has helped a little.
Simply put it breaks down into…
1. Sew yokes on to dress back and attach the top of the front facings to the inside yoke at shoulder seam.
2. Make collar as per instructions.
3. Attach collar and roll everything inside the yoke using the burrito method.
4. Sew neck edge only thus enclosing the collar etc
5. Sew the short edges of the front facings at the hem only. This causes the hem to roll upwards slightly and is correct.
6. Now stitch the long front facing edges to the dress.
7. Complete the rest of the dress!
8. Wear the dress!
If you have any questions I’ll do my best to answer them but until next time
I resisted sewing any Closet Core patterns (previously Closet Case) for a long time because I took exception to a facetious remark that company founder Heather-Lou made about pattern cutting in an interview I listened to a few years back on the now-defunct Stitchers Brew podcast.
Obviously this approach harms no one except me and eventually I stopped sulking and relented because they had produced some really nice-looking patterns in the intervening years (and drafted by a professional pattern cutter…)!
I bought the Sienna Maker jacket because I was attracted to the variety of options it had including different lengths, quirky sleeve pockets and a button-up back vent on the short version plus the elements were all largely ‘mix-and-match’. This is something that’s always been quite normal with paper patterns from the traditional Big 4 (they aren’t 4 any more but you know what I mean) Indie patterns seem to often have a tendency for fewer versions in a single pattern and then you’re left to put your own spin on them, or they create add-on packs when they notice what others have been doing for themselves.
Anyhoo, in the autumn of 2022 I was going on a sewing retreat hosted by Sew Me Something in Stratford upon Avon so, using some printed needlecord from Barry’s in Birmingham, I cut out the short version of the Sienna Maker as one of my projects to sew while I was there.
The Sienna Maker is intended to be slightly oversized so I based my size choice on my bust measurement (39”) and went with a US14. I’m more than happy with the fit and there’s room for a layer or two in cooler weather (it isn’t lined though so this does make it a little trickier to get sweaters down the sleeves)
I found the instructions and diagrams really thorough, it’s rated as an advanced garment and I would agree with this because you’re dealing with some unusual or more tricky techniques, plus the fabric will probably be stiffer or thicker than most dressmaking fabrics. A good degree of accuracy is needed to create a sharp collar and lapel for example but I thought the diagrams and instructions for this area in particular were very good. It’s helpful to be clear which is your right and left because the two longer coat styles don’t have symmetrical details on the fronts so if you’re in any doubt (especially if the fabric is the same on both sides) put sticky labels onto the pieces until they are sewn together.
There is a lot of encouragement to create the garment you want by including various suggestions for seam finishes for example. I used a mixture of bias binding (Hong Kong finish) and simple overlocking but you could use flat fell seams for some of them if you wish. I’ve had a look and the Closet Core website has loads of tutorials for different techniques and methods so you might find something helpful there if you’re a bit stuck.
I made my own bias binding for both jackets, and for the short version I topstitched and made buttonholes in a contrast bright pink. I bought some fabulous metal buttons from the amazing selection at Textile Garden you’ll be spoilt for choice! You could also use heavy duty poppers instead.
I’ve had so much use from this short version since I finished it last October, I just find it really comfortable to wear, the pockets are really handy and surprisingly the unusual print seems to go with everything.
Fast forward to April 2023 and I was heading to a different retreat with my Sew Over 50 photo shoot pals to a wonderful place we’ve found in Derbyshire.
When I bought the pattern I had always intended to make a longer version too, I just hadn’t found the right fabric. Eventually I settled on the 12oz organic sanded twill cotton from Merchant and Mills in the Stanley Tan shade after seeing it made up as a jacket by a friend. I decided (and I hope I don’t live to regret this…) not to prewash it, my rationale being that there was quite a lot of fabric so it could end up streaky from the washing machine. Also, because it’s a coat, it won’t get laundered very often anyway and I could get it professionally cleaned when necessary.
I opted to make the longest version with the belt and D-rings so there are no fastenings this time, it has a deep front overlap which personally I feel crosses over to the wrong side, I would normally cross right over left so it feels a bit alien. As before, the instructions are excellent, there are a couple of areas where you really need to concentrate like making the opening on the front for the belt to pass through. My top tip would be to make sure you have transferred all the pattern markings carefully before you do any sewing because the two fronts each have different features, I used lots of tailor’s tacks!
Inside finish of the belt carrier
In spite of the distractions of sewing with my friends I took each part of the process slowly to make sure I had everything in order and a really nice quality finish. Once again I made bias binding from a blouse I no longer wore but liked the fabric, it has a new life inside the coat where I can see and enjoy it for far longer than as an unloved blouse.
The coat has an attached belt which slots through D-rings on a tab to fasten (which I already had due to a major cock-up when ordering trims for a ruck sack pattern, but that’s a story for another day…) There are some very thick layers in few places but my Pfaff handled them superbly, I used a chunky jeans needle throughout.
The suggested finish is to topstitch all the facings and collar but I decided against this and I spent a quiet evening herringbone stitching them all in place. If you are going to machine topstitch I strongly suggest tacking (basting) the stitching line so that you have an accurate line to follow on the right side, this should hopefully reduce the need to redo areas where you may have wobbled off course.
I hope I will get as much use from the new longer Sienna Maker as I’ve had already from the short version, it will be too warm on sunny days but for our unreliable weather I’m sure it will be great. I didn’t want a heavy full-length coat and so just-above-the-knee suits me fine. Incidentally, there’s a large interior breast pocket and I didn’t include the back hem split. The fabric is beautifully soft but weighty, it has a suede-like finish, pricey but superb quality.
Delighted as I am with my new coat I can’t help feeling that there’s more than a hint of four candles and Arkwright’s stores about it but no matter, in my head perhaps I should rename it the Ronnie! [one for my British readers there…]
I’ve got a couple more Closet Core patterns in the pipeline over the summer, I made a Mile End sweatshirt last autumn and I’ve also bought the Nicks dress which I’ve got fabric lined up for already plus I’ve just invested in the Kalle shirt so I must be impressed with the quality of the patterns!
In the spring of 2022 Lamazi launched their first range of exclusive design fabrics called Garden of Dreams which proved to be a big hit with customers so now, in Spring 2023, they are launching a second range called Summer Party. This collection includes printed linen and viscose marrocain and has been created by super-talented surface pattern designer Rachel Parker using vibrant shades and subtle pastels.
This is the Garden of Dreams fabric which I used to make McCalls Marina #8090 last summer. It’s a Tencel with Lyocel Sateen and an absolute delight to sew and even nicer to wear, it has the most beautiful weight and drape. I squeaked this dress out of 2m of fabric and it was worth the head-scratching because I’ve worn it a lot.
Liana at Lamazi generously gave me my choice from the new collection so I opted for the gorgeous Painted Foliage design which comes on a fine, more environmentally-friendly mill-washed linen, it is semi-sheer and reminds me of beautiful stained glass windows with the sun shining through them. It’s been lovely to work with so I’ll share some of my experiences of sewing with it you.
Because the linen has been mill-washed it’s already beautifully soft but I gave it a pre-wash anyway for my own peace of mind, habit I guess plus I’ve learned the hard way over the years!
Like the Marina dress I wanted to use every possible scrap of the 3 metres of fabric so I chose to use the Maven Wendy smock top (which I already had) for the bodice and then a simple tiered skirt attached at the bottom. A tiered skirt is an excellent way to use every bit of fabric because, with a few calculations, you can simply cut (or tear with certain fabric types) strips across the full width of the fabric available, gather them up and attach to the layer above/below.
I chose to cut a size medium for the blouse although I probably could have sized down to a small, I actually reduced it though the underarm seam after trying it on the first time. I shortened the length by about 30cms too, the amount you need to shorten by will vary depending on the look you’re after. I also wanted more fullness in the sleeve so I ‘slashed and spread’ a traced-off copy of the sleeve pattern to give added volume.
Divide the sleeve pattern vertically into a number of even-width strips (not including the armhole edge though, that remains unchanged) and cut from the hem to just before the top leaving a tiny amount of paper still attached. Pivot each strip open to add fullness at the hem, plus an additional 3cms to the length for a longer finished sleeve. When you’re happy with the shape retrace the new configuration.
By folding the selvedges into the centre fold I could cut the front and back bodice pieces side by side [this is also useful when you need to ensure the good pattern match on a print] I used the various gaps between the sleeves and bodice pieces for the two small patch pockets and the front neck facing. So that I kept the remainder of the fabric as untouched as possible I had to cut and join lots of bias strips for the neck binding. From everything that was left I cut (across the fabric width) two strips measuring approximately 30cms deep and three strips approximately 40cms to form the skirt. [I could have simply cut the remaining fabric into two equal rectangles and made a gathered skirt from that but I wanted a more interesting skirt and sewing the skirt in tiers like this gives a fuller hem] Eventually there were only very small scraps left.
I opted to add some decorative stitching using this Gutermann Deco Stitch 70 thread. The trailing leaf design seemed appropriate from the wide selection my discontinued Pfaff Quilt Ambition 2.0 offers. Attaching the V neck facingMore trailing leaf embroideryAdding the neck binding-I gently pulled up the edge with two rows of gathering stitches first then attached the binding. Because the linen frays a bit (it’s a loosely-woven fabric so this tends to happen and is to be expected) I overlocked the edge before turning the binding over it to finish.I secured the binding in place with more embroidery which ran right through to the tie ends as well.
Next I constructed the skirt, I opted to overlock the cut edges before gathering because of the potential for fraying-I would normally overlock afterwards.
I simply joined the two 30 cms strips at the short ends to form a loop, these seams would eventually match the side seams on the bodice. The three deeper strips were also joined at the short ends to form an even longer loop. I turned one long edge of this section and hemmed it using the trailing leaves embroidery and on the remaining long edge I sewed two rows of gathering stitches, this was pulled up and attached to the shorter skirt section. Finally I gathered the remaining top edge of the smaller loop and attached the whole skirt to the bottom of the bodice, no pattern needed!
Lastly, I created a casing on the bottom of the sleeves and ran elastic through them.
The fabric is semi-sheer and I’m wearing a nude slip underneath it but I didn’t feel the need to line it.Like almost any linen some crumpling develops but I really don’t think it’s excessive or unsightly.Lots of lovely volume for swishing aboutI can’t wait to waft about in this over the summer months
Because of its semi-sheer quality I don’t think the fabric is particularly suitable for trousers or shorts, at least not without lining or mounting it first. It’s a softer linen which lends itself to more unstructured shapes, maybe with gathering, pintucks or soft pleats so shirts. blouses and dresses are ideal. It doesn’t have much drape though unless cut on the bias.
Thank you once again to Lamazi for providing me with this beautiful cloth, I know there are still a few more exclusive collaboration fabrics to come into stock so do keep an eye on the website or sign up for the newsletter. Small businesses are having a very tough time at the moment and I have no qualms about the quality of cloth and the standards of service that Liana and James continue to offer at Lamazi. I was given the fabric but have not received a payment for this article.
I bought 3 metres of this gorgeous viscose crepe fabric (originally bought from Fabric Godmother in July 2020 in probably long discontinued) but it sat in my stash for nearly 3 years before I could decide what to make with it! The problem was that I liked it so much that I didn’t want to waste it on something which didn’t show off the beautiful ‘ceramic tiles’ print, utilise its gorgeous drapey qualities, or which left too much wasted. I would regularly get the fabric out and pin it onto Doris in various ways to see if I could settle on anything in particular. I knew it had to have simple lines and I didn’t want complicated pattern matching to break up the design. In the last year I’ve made a number of LB Pullovers from Paper Theory and it occurred to me that the top was just the right shape to use for the bodice (minus the sleeves and collar) and then I could use what was left for a skirt.
Washed and ready for a three year wait….Four versions of the LB Pullover, so far
I used approximately 60cms for the bodice (I was able to place the front and back side by side across the width) and then everything that was left I cut into strips across the width following the ‘tile’ design. I had enough to make 3 tiers to the skirt and, ideally, each one would have been twice as long as the one above but there wasn’t really sufficient for that. I reckon the tiers were more like one and a half times as long so that would have to do.
I finished the neck edge with narrow binding which I managed to eke out of the remnants. I sewed a reasonable amount at the penultimate Herts Sewcial in early March and then finished the rest later at home. I was over-confident in the fit though because when I tried the finished dress on it was too big. I wanted slightly over-sized and my previous LBs were all a good fit but this crepe fabric had ‘grown’ a bit so I needed to bring the sides in to give it more shape. On the inside at the waist and running horizontally across the side seams I made a wide channel about 25cms long by 5cms through which I inserted elastic approximately 12cms long that pulled up enough for me to be happy with the effect. I finished the dress ready to take on holiday, our first cruise in more than 3 years.
Each tier is as deep as the tile print.
Happy Anniversary to us and cheers to 34 years married!In the fancy atrium of the shippratting about in the fancy atrium of the ship!It’s a bit hard to tell which is front or back so I sewed in this helpful Kylie and the Machine label
It might have taken nearly three years to get there but I’m really pleased with the final result and I know I’m going to enjoy wearing this dress in the coming months.
Do you dither as long as me about what to sew with fabric you love? I can’t be the only one who gets their various fabrics out periodically, strokes it, considers it, matches patterns to it and then folds it away again until next time!
Unless you’ve been living under a rock for the last four and a bit years, if you’re a maker of your own clothes, and you are part of the Instagram sewing community in general then you are sure to have noticed @SewOver50. Being a follower of the account might even be the reason you’re here reading my blog at all.
I won’t go over everything again because you can read most of it in the Sew Over 50 section of this blog, if you don’t already know how the @SewOver50 account Instagram came to be set up it’s all there.
What I’ve been thinking about over the last few months though is how much has actually changed, and have things improved as a result, or have we developed into a different entity?
There has definitely been a noticeable improvement by some pattern brands to include a wider variety of models in their marketing and this is worth applauding. For example, brands such as Merchant and Mills now feature several older models which was not something they did before, and Sew Over It made a noticeable choice to add older models by recruiting from our own community, including Janene @ooobop and Lena @That LenaKing. Sew Over It also went so far as to join forces with Judith and Sandy last year in a week-long online collaboration, wouldn’t it be great if more companies took the opportunity to truly engage with the 45,000 followers of the account in this way? In the past couple of years we have seen a change for the better in the number of larger-size models featured by pattern companies because so many of them are now making a much broader range of sizes but it seems that it’s still younger models that they go for, with one or two exceptions.
This is all well and good but has there been as much change as we might have hoped for more than four years down the line and after all we’ve done in continually trying to raise our profile? Or have we partly stopped noticing that the changes have slowed down, have we stopped agitating for it because we have become such a close and supportive community in our own right that we just don’t need to care so much? I could argue that we now have each other to bounce our ideas off, to inspire, we encourage and educate one another. As adults of ‘a certain age’ we really shouldn’t care, because we certainly don’t have to care, that the majority of younger designers and pattern makers don’t want to engage with us. They seem to believe they still don’t need to do anything to make our custom feel appreciated, although the current world economic situation might eventually make it otherwise.
By each of us continuing to share our makes regularly on Instagram, and using the various #SewOver50 hashtags, we have created our own self-supporting community to the point that we neither notice nor care what most pattern companies think about us (do they think about us?) because they are still barely engaging with us anyway. Greying hair and wrinkles spoil their aesthetic but that’s just tough, we will sew and wear what we want and their artfully constructed Instagram posts are not going to sway us. What can influence me personally is a positive review of a pattern by fellow sewers and honest feedback about its quality, it isn’t the pretty packaging which will make me want to buy the pattern. Some pattern companies do enlist the help and experience of older sewers with their pattern testing which is good (although I’m slightly suspicious of the ones which use older testers but then their versions of the garment are curiously absent from the company feed when the pattern lauches) If you’re interested and willing I would certainly encourage volunteering to test patterns, bear in mind you are still unlikely to be paid for your time or materials although there are exceptions. These days I’m much more circumspect about who I give my skills, fabric and time to. I wrote a blog on this very subject back in 2019 which I reread recently, and I’d quite forgotten that there were a number of very interesting comments from readers at the end too.
Since the start of SewOver50 we now have other ways of communicating our thoughts and opinions with others, for example with the podcast Sew Organised Style that Maria @velosews has been producing for several years now. You can jump over there to listen by following this link. She covers a wide range of topics and is always happy to hear from us so if you have a project, a challenge or maybe an event which you think others will want to hear about then get in touch with her.
In a recent development, Byrd @yogabyrdsews and Molly @MikeandMollyshouse have now started a regular Instagram Live #So50Live where they chat together about their own sewing goings-on and they often welcome guests for a natter too. They are both based in the US so each Live event takes place at differing times to allow for global time zones, in other words sometimes favouring European time zones or sometimes better for Australasia. When the Live event is taking place you can join in by sending questions or comments for them although this isn’t possible if you are watching it later on and not live. You can always watch at a later time by following the posts saved on the SewOver50 grid.
Sewing magazines often feature items by or about older sewers, reader pattern reviews are a regular in many and Judith and Sandy have contributed to several UK-based publications but we’d still really like to see more older professional models on the covers and in other articles though. We should try to do all we can to dispel the ‘old lady sewing’ image that still persists.
For me and many others, the greatest part of SewOver50 has been the feeling of connections and community which it has fostered, we share inspiration and encouragement. Many of us have formed new friendships, often locally and sometimes all over the world, we find so much enjoyment in being able to meet up and talk about sewing and fabric regardless of anyone’s age. Don’t wait for someone else to set up a sewing sewcial or a meet-up, if there isn’t one happening where you live have a go at doing it yourself. If you have a fabric or craft shop locally would they be willing to host you, it could be mutually beneficial, or are there textile districts in the town you live in? Textile and craft fairs are another great way to meet and chat with others I’ve always found. Or why not go to a gallery or museum exhibition together, I find chat flows very easily when you’re sharing the experience with others in this way.
Participating in sewing ‘challenges’ can be another very inclusive and fun activity, SewOver50 always do a fantastic round-up of the current ones on the grid, watch out for them on Stories or saved in Highlights There’s never any pressure to participate but there’s bound to be something which will pique your interest, focus your wandering mind, or just help use up some of that stash!
There is much to celebrate in the difference that being part of SewOver50 has made to many of us, no matter what our actual age. We’ve become an account that is worth aspiring to be a part of because of the positive ageing message that we present. No one shies away from the tough stuff though, many of us will be ’sandwiched’ between caring for ageing parents or looking after grandchildren, we have health issues, financial worries, the global situation is extremely concerning but if you can spend a little valuable me-time sewing or crafting and know that, if you share a photo of the outcome (and even the failures!) with the hashtag #SewOver50 then somewhere in the world members of this community will appreciate what you might have had to overcome to get to that point!
Join in the conversations, keep raising our collective profile, we’re probably the ‘youngest’ older generation there has been so far. What I mean by that is that many of our mothers or grandmothers were ‘destined to be middle-aged’ by the time they reached their teens, in their clothing, their hairstyles, their aspirations and outlook on life simply because that was how it was then. On the whole we now have more options and opportunities than ever before and are able to embrace life in a way they couldn’t, if we can continue to combat age-prejudice from our little corner of the internet then wouldn’t it better for everyone in the long run?
Well, here we are at the end of another year which has not been without its challenges again. We’ve been learning to live with Covid 19 as a fact of life but 2022 has been tumultuous in terms of other world events, including the beginning of the war in Ukraine, multiple Prime Ministers here in the UK, the Platinum Jubilee and then the death of Queen Elizabeth, and a worsening cost-of-living crisis, to name but a few.
You haven’t come here to read my personal thoughts on any of these though, there are many who have or will continue to comment more eloquently, passionately or noisily, than me and my blog is for me to detail my sewing.
I began the year with sewing a few garments for the book written by Juliet Uzor to accompany the spring series of the Great British Sewing Bee. The series didn’t air until the late Spring so I wasn’t able to share these photos at the time. In total I sewed five garments which featured, some of which were Juliet’s original designs and others were pattern challenges from the new or previous series of GBSB. Obviously when I’m making these samples I’m sworn to secrecy and I’m rarely told anything more about them anyway until the book comes out. I really enjoy sewing for this though and whilst there are time pressures and it has to be my best possible sewing that’s a challenge I’ve enjoyed rising to. [I’ve sewn for a few books now so I know what’s expected] I have to say that I have no idea how the Bees manage to complete the pattern challenges in the time allowed because they took me a jolly sight longer than a couple of hours!!
a silk organza blouse with shirred detailsOne of Juliet’s original designsthe patchwork jacket which featured as a pattern challenge. Juliet modelling the patchwork jacket
Immediately I finished these garments I became a Backstitch Ambassador and sewed up my first Merchant and Mills Ellsworth shirt. You can read my review of it here, it’s proven to be the most popular post of the year.
The Ellsworth shirt for Backstitch, plus I’m wearing the Eve trousers also by Merchant and Mills. I’ve sewn 5 iterations of them in 2022, it’s such an adaptable pattern.
Next I sewed a Paper Theory LB Pullover from a herringbone tweed wrap which I made a few years ago and then never wore, this became the first of 4 LB Pullovers this year. It’s occurred to me that I haven’t blogged this top yet so I need to put that right in 2023. The trousers are another pair of Eves in soft corduroy and they featured in a Sew Over 50 post I wrote early in the year with many of your favourite trouser patterns in.
An upcycled LB pullover with cord Eve trousers.I sewed this Named Talvikki sweater in a really thick sweatshirting I bought at 1st for Fabrics. I wrote a review of it over on the Fold Line website if you’re interested.
I also hosted a couple more of my Herts Sewcials before the lawn bowls season started again and we had to stop until early October. They have been such a source of fun and sewing camaraderie and I hope to announce some other sewing days later this year. It all takes time to find a suitable venue, make bookings, advertise etc etc though
I was (finally) struck down by the first of two bouts of covid in late February which meant I had to miss out on the The Stitch Festival show in London and being in the first ever Sew Over 50 lounge. This was particularly gutting because I had organised the whole rota of people who had generously volunteered to ‘woman’ the space over the four days and I couldn’t share all the fun and chat, and the fashion show which I could only watch unfolding on social media from home.
I sewed a Tilly and the Buttons Nora cardigan using another of the fabrics I bought from 1st for Fabrics and it’s been in regular use on chilly days (I’m wearing it again right now)
I diversified a little after that when I made a fabric roll to keep our ‘good’ cutlery in. It’s only ever lived in a box with bits of tissue and an elastic band around the items so I finally got around to making something more suitable. I used a couple of fat quarters and some Liberty off-cuts in the stash, plus some wadding to go inside. The embroidery function on my machine was very handy for making the labels for each pocket too, all in all a very satisfying make.
Dhurata Davies had very generously gifted me a copy of her Overlap pattern in 2021 and I bought this silk habutai fabric from Hasan, the Man Outside Sainsbury’s in Walthamstow specifically to make it. However, it took me until March 2022 to actually do so! I’m so glad I finally did because it’s been absolutely lovely in warm weather and on holidays, it’s so light and folds up very small. The construction of the collar and facings on it are things of beauty too.
I used a ‘vintage’ 80’s blouse pattern in my collection to sew a shirt dress for our delayed holiday to Antigua in March. We should have gone in March 2021 to celebrate Mr Y’s 60th birthday but world events scuppered that. In spite of my having Covid just two weeks before we were due to go I was cleared to fly at the last minute and thankfully we all made it there-and back-without further problems.
I sewed the first of two Elbe Textiles Serpentine hats, the first from Ellsworth leftovers. Because I hadn’t been able to leave the house in the lead-up to our trip I had to make do with the interfacing I already had so the brim wasn’t really stiff enough. It was shady and kept the sun out of my eyes though. Mask-wearing was still strictly enforced in Antigua.
As soon as I got back from holiday I chatted on Instagram live with Gabby of Gabberdashery on her Quick Unpick feature. It was nerve-racking to start with but I quickly forgot that people were watching and just enjoyed nattering with Gabby. It wasn’t as bad as all that!
I had been wanting some kind of vest or tank top for a while and then Charlotte Emma patterns released the Clove Vest which was exactly what I wanted! I bought, printed, stuck together and sewed one in double-quick time and I have been using it ever since. In fact I’ve just made another using small leftovers of another project so it’s a good way to use remnants up.
The Clove Vest in action on a walking trip to the Yorkshire Dales, Swaledale to be exact.
From Yorkshire we continued north to Scotland where we had the huge pleasure of staying with Sew Over 50 Supremo Judith Staley. The OHs went off to play on trains while Judith I went first to the V&A in Dundee and the following day we visited the Great Tapestry of Scotland which we would both highly recommend.
In April I organised a quick, low key, visit to Walthamstow market where I caught up with friends old and new. Not too many purchases on my part, I’m more of an enabler…
I delved into the remnants box and found enough of this linen to make a short-sleeved Fantail Top by The Sewing Revival, I love the gathered elastic hem detail on this pattern. Using fabric I bought at Walthamstow I sewed this shorter, wider pair of Eve trousers.
I returned soon after to Walthamstow and the William Morris gallery to catch the small-but-perfectly-formed exhibition of Althia McNish’s work. Until I listened to the very first Haptic and Hue podcast nearly 3 years ago I had never heard of this wonderful textile designer. I’m very glad I know about her now because her designs are so full of life, colour and vibrancy.
I hadn’t sewn anything for Lamazi as a blogger for a while but I was able to make this McCalls 8090 using their beautiful own design Tencel Lyocell ‘Garden of Dreams’. It has the most gorgeous handle and drape, and I love the vibrant colours of the print. It worked beautifully for this pattern and I’ve worn it loads, plus I’ve layered long-sleeved tops under it this autumn/winter, and with tights and a cardigan over the top too. I really must write this pattern up as a proper blog post in 2023!
In late April myself and my fellow Love Sewing modelsfinally FINALLY got to Thirkelow in Derbyshire for our sewing retreat. I can’t tell you how many times this got pushed back and pushed back because of the pandemic and we were all just so thankful to be together as planned and have a wonderful time chatting, sewing, walking, laughing, eating and drinking at last. We booked for 2023 before we even left, and 2024 is in the diary too!
I made my second LB Pullover while I was in Derbyshire (yes I actually got some sewing done…)These are the Trend Utility trousers from a couple of years ago.
Another departure was a waistcoat for Mr Y, everything except the buttons (ironic when you see how many buttons I have) came from the stash. I first used the pattern over 20 years ago for some wedding ushers.
I don’t think these Marcy Tilton trousers have been my biggest success…I’ve met someone since who was wearing them and they looked great so if I size down by at least 3 sizes (or more) they won’t look so voluminous, I hope.
I made my second Serpentine hat which worked better than the first, I wore it loadsClaire and I went to both Africa Fashion and Fashioning Masculinities at the V&A on the same day and unexpectedly bumped into Barbara so we all had a lovely outing together
Farie from GBSB Series 7 was a work colleague of my friend Jane who kindly hosted a lovely lunch so we could all meet Farie and have a good old chat about all things Bee and sewing!
I spend a good deal of time sewing this jacket for my dear friend Sue for her son’s wedding in July, we bought the stunning fabric from Misan in the Goldhawk Road. It all got rather more complicated after she broke her wrist on holiday and I had to make the whole outfit because she couldn’t get to the shops!
The ridiculous steaming heat of July meant I moved everything indoors where it was only marginally cooler. Sue’s top was the Maker’s Atelier gathered top from their spring/summer magazine sewn in crepe-back satin.
I was asked by a friend if I could replicate a dress she had seen last year online so eventually I was able to create this dress partly utilising an existing 1980s pattern and partly by pattern cutting other elements myself. Our measurements are very similar so I dug this cotton fabric out of the stash and made a version for myself first which Lynn then tried on as a toile. Astonishingly it was all perfect so I made her own dress without any need for further fittings!
I’ve made a second version for myself using some very inexpensive fabric from Walthamstow. This time I made a new cropped bell-shaped sleeve and altered the front to add a shirt collar.
After my second bout of Covid (thank you MR Y) June saw us able to travel on a long-planned trip to Tuscany in Italy. We had a wonderful stay in Florence which included a visit to Bacci Tessuti which was chock-full of beautiful fabrics. I bought myself a lovely piece of fine linen and Mr Y treated me to two pieces of Liberty Tana lawn. I also bought a remnant of Pucci silk/cotton which was just enough to make a short version of my own Dexter pattern.
I added a button backThis was the first version of a short Dexter in fabric that had sat in the stash for a while.
And then in August I turned 60…
Afternoon tea at Cliveden was one of my treats over a wonderful weekendAt the end of August we had the opportunity to get up close and personal with several hives full of honey beesThe exhibition celebrating 150 years of the Royal School of Needlework at the Fashion and Textiles museum was well worth a visit with many beautiful exhibits including this stunning Red Dress
At the end of September was the event many of us had been waiting months for, it was the very first Sew Over 50 Frocktails event held in Edinburgh and hosted by both Judith and Sandy! I suggest you pop over to the blog post I compiled afterwards to get the full rundown with loads more pictures.
The beginning of October saw my Herts Sewcials recommence again. I didn’t have a project to sew until the day before, there was lots to organise and I became so indecisive! At the last minute I settled on the Portobello Trousers by Nina Lee in a bright pink crepe and what a good choice they were, I’ve really enjoyed wearing them!
Next up I headed to London and the autumn Knitting and Stitching show, not once but twice!
Catching up with Maria from the Sew Organised Style podcast and Sewing Bee alumnus Mercedes Another Bee, Jen Hogg on her own Jenerates stand this time along with Sew Over 50 stalwart Sue Stoney, also visiting from AustraliaI was the only non-Australian here at the Tessuti stand!Trying out a Simplicity PDF for the first time
In October I treated myself to a Sew Me Something retreat in Stratford upon Avon which was so enjoyable and I met some lovely people while we all sewed together.
Day 1 hotel mirror selfie, the Olya shirt by Paper Theory and those pink Portobellos again.On day one I completed this Tessuti Lily Linen dress in red check bought at the K&S show a few weeks earlier. I love this dress but sadly I’ve got to do some fixing because somehow a pen I was using sprang a leak and blobbed ink down the front skirt! I’m very upset about it and I think I’m going to have to cover it with a patch of fabric if I can match it successfully.Fun times with CL @thriftystitcher and my chum Elizabeth came to visit on day twoThird LB pullover of the year, a sleeveless one this time and completely influenced by Sandy @sunnydayz and her holiday wardrobeI popped pockets into the side seams
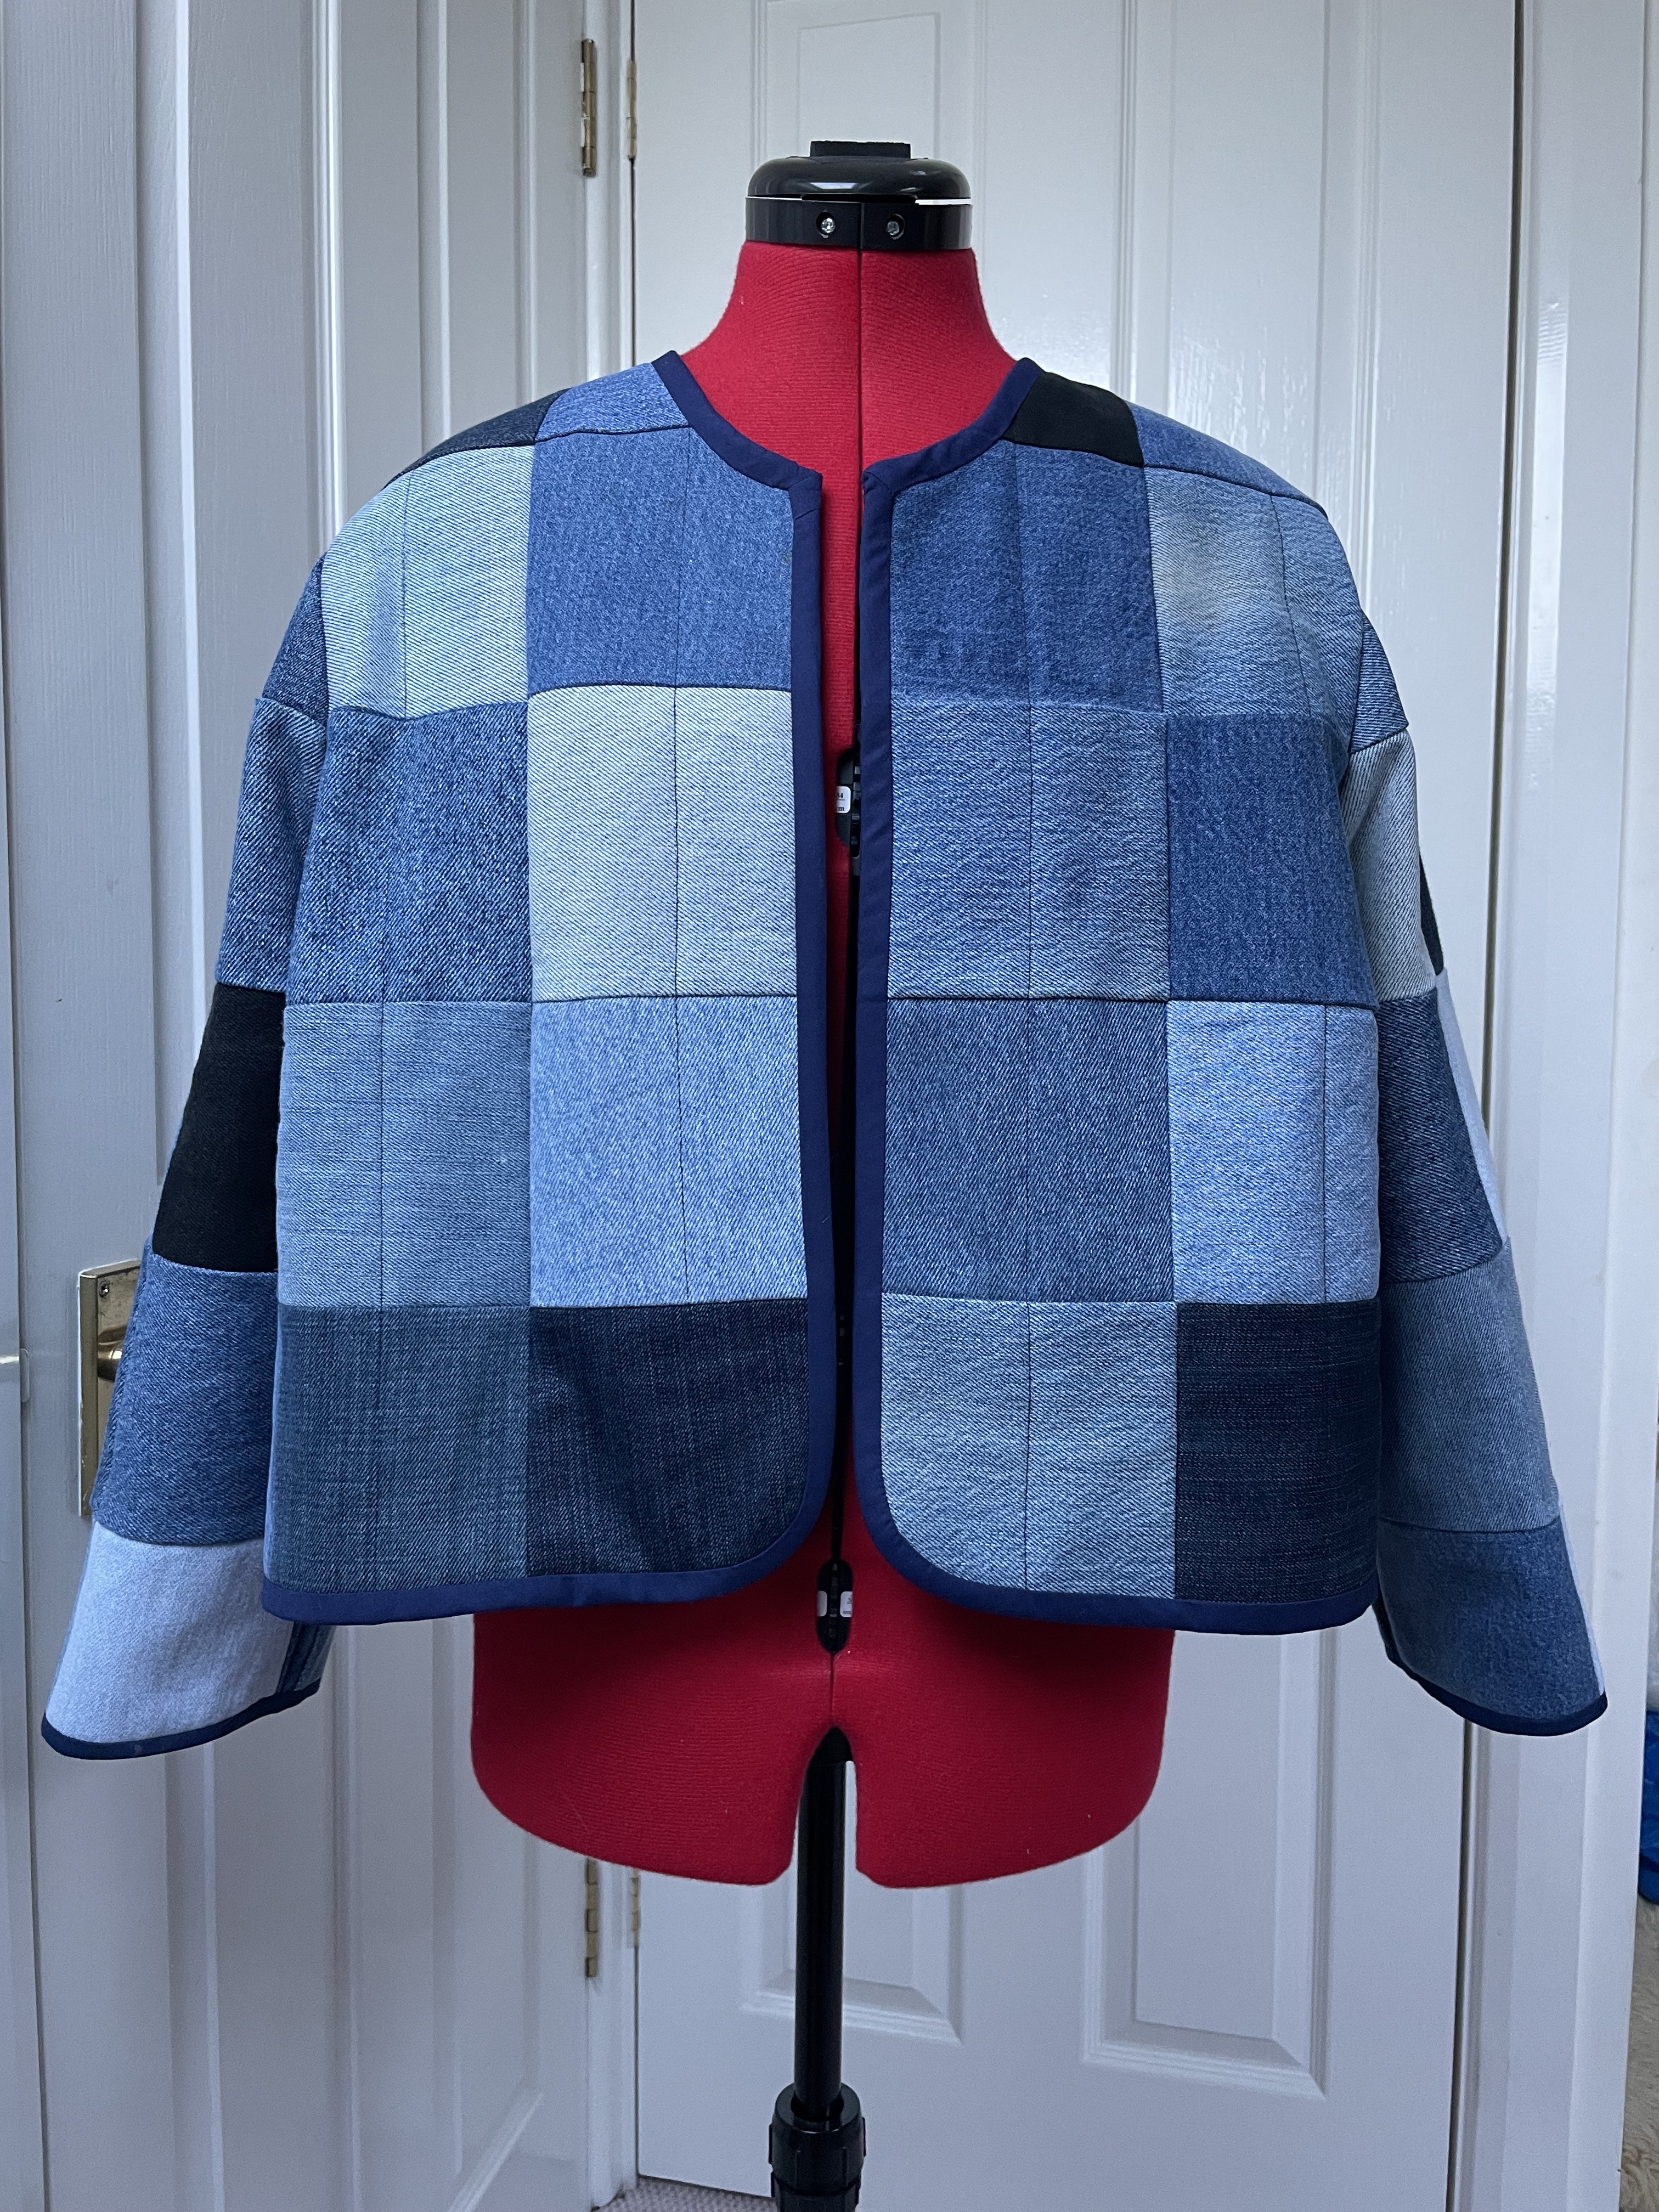
I also started a Closet Core Sienna Maker jacket while I was in Stratford but I didn’t finish it until after I got home. I’ll blog this one in the new year, I’m really pleased with it though and, weather permitting, it’s had a good number of wears so far. After this I also compiled a Sew Over 50 blog post rounding up lots of your favourite casual jacket patterns
In November I had a massive tidy up and sort out in Threadquarters and as a result I made this Fehrtrade Tessalate Tee for yoga from various jersey scraps.
This gorgeous lawn was one of my purchases from the K&S show, as soon as I saw it I knew it would be perfect for another M&M Ellsworth.
Sue treated me to afternoon tea at the Lanesborough Hotel in London and we both proudly wore our me-mades for the occasion.
My next Backstitch blog came at the end of the year when I sewed this cheerful saffron Ingrid by Homer and Howells.
Nearly there, honestly….I constructed another ‘tree’ for the local Christmas Tree festival at the beginning of December, she was called ‘Etoile de Noel’ this year because almost everything came from recycled toiles
We had loads of snow in late December (unusual for this part of the UK) and I took the opportunity to take pictures of this full circle skirt sewn using a vintage Vogue Claude Montana pattern from the early 80s.
A bit more crafting before Christmas with these Festive oven gloves, I found a tutorial on’t t’internet which helped with fabric requirements and measurements but actually you could copy a pair if you have them.
And so to the final two makes of 2022, first was another LB Pullover, this time in ruby red velour-so comfy!
And the absolute final make was another Charlotte Emma Clove vest in stash remnants (from a sweatshirt for Mr Y in 2020)
This wasn’t absolutely everything I sewed in 2022 but most items are there, not all of it was for me by any means. It looks like I need to write up a few more reviews though, they have definitely not been happening so much in the previous twelve months. In November and December I did some teaching for Backstitch which was very enjoyable, I’ll be doing some more in 2023 too. There will be new exhibitions to look forward to in London including one featuring the work of Gabrielle Chanel in the autumn.
Thank you for following my activities this year, it’s been great to meet more of you in real life and I hope we’ll get the chance for more meet-ups again in 2023. I don’t have any sewing resolutions for next year, we’ll just have to see how it all unfolds I reckon.
Until next time, happy sewing
Sue
PS as I was writing this the news about the death of fashion great Vivienne Westwood came through, I wrote a post reviewing her autobiography which I would highly recommend if you want to learn more about her.
It’s been a while since I wrote my first blog post for Backstitch way back in January but I’m happy to say that I have loved wearing the Ellsworth shirt I made then, it’s been a great addition to my wardrobe.
For my second post I’ve sewn a Homer and Howells Ingrid dress. Like many popular styles circulating this year it’s a loose-fitting dress but the USP of the Ingrid is its unusual asymmetric style lines.
The front and back are both quartered by differing horizontal and diagonal seams, plus the bust shaping is in the form of tucks in the centre front seam. It pops on over the head so no zips to insert, there are inseam pockets and a choice of two skirt lengths and two sleeve shapes.
I felt with all this unusual seaming going on that I didn’t want a busy printed fabric which disguised it (that said, you could have fun with stripes or even checks) My original plan was to use needlecord and deliberately cut the pieces in opposite directions to highlight the shading this would create.
However I wasn’t sure that any of the colours available in the shop at the time I was making it were really very ‘me’ so I plumped for the saffron yellow Broderie Anglaise double gauze instead! [I made this handbrake turn decision partly based on having recently seen a woman wearing a similar style RTW dress made in grey Broderie Anglaise and the fabric looked great, not too ‘girly’ or twee at all]
The stitching on Broderie Anglaise fabric usually has a right and a wrong side if you look closely at the embroidery but it isn’t always very obvious. My advice would be to choose the side you prefer and stick to it throughout! Because virtually every piece of the Ingrid is cut as a single I pinned paper labels onto each one so that I didn’t get them mixed up. Alternatively you could use small sticky dots to differentiate.
I gave the fabric a pre-wash before cutting, there was virtually no dye run and no obvious shrinkage either. Because of its asymmetric shape the Ingrid is almost all cut from a single layer of fabric so I would highly recommend keeping each pattern piece attached to the fabric until you’re ready to use them, or label them as I’ve suggested earlier. [Incidentally, if ever you’re short of fabric for a project, check if you can cut it out of a single layer rather than folded, it’s always more economical…just make sure you mirror everything as necessary] Helpfully Backstitch sell their fabrics in 25cm increments which can mean a lot less wastage, I bought 2m25 for this dress.
I pinned rough labels to the pieces so that I knew exactly which one was which.
I found the instructions and diagrams for construction nice and clear and very straightforward, do read them through a couple of times first though because I made assumptions about the order of making in a couple of places which would have led me up the garden path and some unpicking. The right and left dress parts are sewn tops to skirts before joining vertically at the centre front and back. Some of the seams which would normally match one another on more conventional styles don’t on the Ingrid because of the asymmetry but if you start pinning at the top of each seam down to the hem you should be fine.
The fabric sewed up nicely although be aware that the weave of double gauze causes it to have a little inherent stretch so try not to pull it about too much during construction, and pressing causes some of the natural crinkles of the cloth to flatten as well but they will bounce back after the next wash.
I made a couple of other small deviations from the pattern by using self-fabric bias binding instead of the neck facing. I cut a bias strip 4cms wide, folded and pressed it lengthwise before sewing the two cut edges to the neckline on the dress. Next, I understitched the seam to the inside then finally topstitched it down to finish. I also chose to sew my own thread loop for the button at the back neck rather than try to make a rouleau loop with such ‘bobbly’ fabric, I was delighted to find a button in the shop which is a great match to the fabric colour.
marking the centre front point on my folded bindingPinning the bias binding in positionClose up of the centre front seam details
I wasn’t convinced that either skirt length would be quite right on me so I went somewhere in between, finishing a little below knee length (I’m 5’5”) I wanted longer sleeves too so I used a bell-shaped pattern with a cuff which I had drafted myself for a different dress earlier in the year.
My sleeve has a fixed cuff with gentle gathers (incidentally, the colour here is paler than in reality, the outdoor photos of the finished dress are much more accurate)
Finally, I turned up the hem by 2.5cms and then used one of the huge range of embroidery stitches on my Pfaff machine to sew it up, it took a while to go all the way around the hem but I love the little detail it gives.
The hem is finished with a machine embroidery stitch
The only fitting change I will probably make if/when I sew another Ingrid is to slightly reduce the width of the shoulders, the sleeves cause them to droop off my shoulders a little but it’s not a major issue. I sewed the UK14 with no fitting adjustments other than the length and it’s very comfortable.
The back seams are asymmetric tooThe button and hand-sewn loop
Thank you to Backstitch for providing me with the fabric and supplies to sew with by means of gift vouchers, the Ingrid is not currently stocked in the shop though. Broderie Anglaise might not be typical winter fabric but I love the sunny colour on a miserable English day.
I hope you’ve found my review helpful, until next time,
The previous Sew Over 50 posts I’ve compiled for your favourite T-shirts and flat-fronted trousers have proven to be extremely popular reference sources for you so I thought it might be useful to add another pattern type to the series.
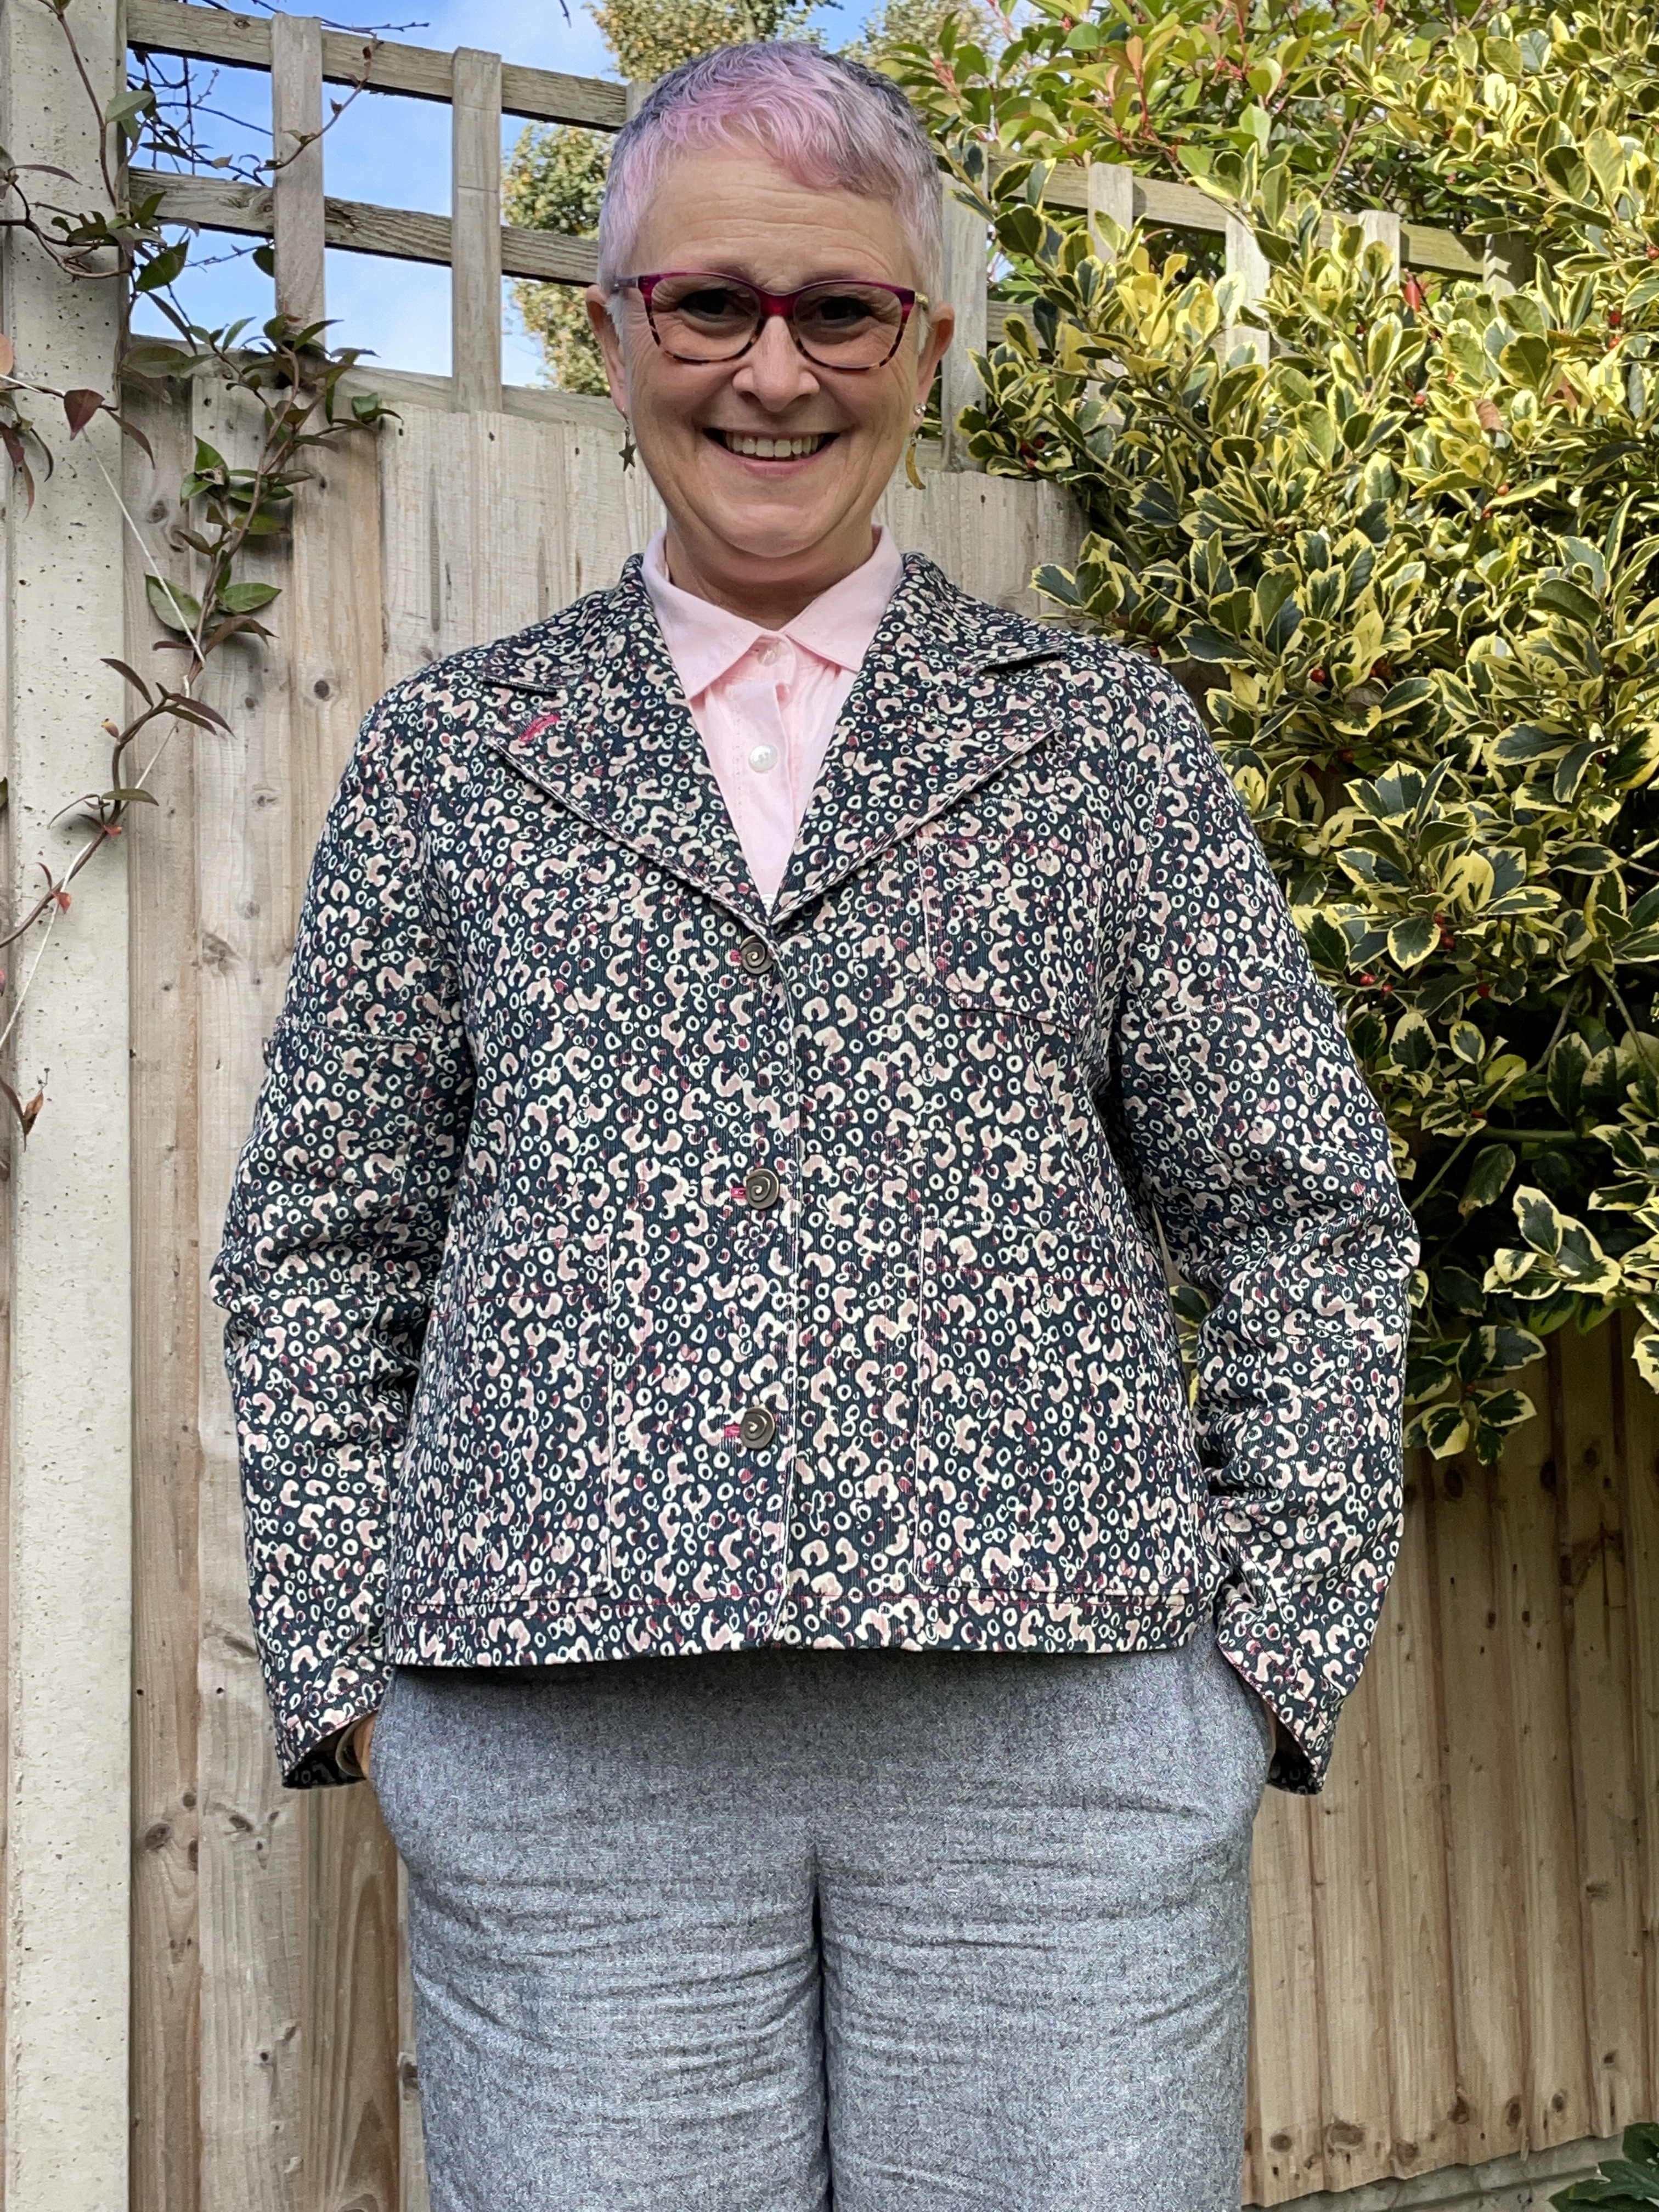
This time I’ve chosen to focus on the short(ish) casual jacket, which I discovered has a wide variety of names depending on where you live (or which generation you are from) including jeans, utility, shaker or chore jacket. You know the sort, often workwear-inspired with plenty of pockets, it can be thrown on instead of a cardigan or a heavier coat, it might be a little more chic than a sweatshirt, or it might not. In fact it could be pretty smart depending on the fabric choice or maybe it’s super casual, definitely no longer than hip length though. So already lots of options but those were the basic criteria and then I threw it open to all of you for your own recommendations.
I started my research by going to the #So50Jackets hashtag. You can usually then select images by choosing between ‘top’ or ‘recent’ categories. Top will be the most popular images with loads of likes, probably as a result of the number of followers that an account has or it’s a really cool garment and the algorithm will skew its visibility. I tend to select recents because the images are exactly that, more recently sewn (or at least posted) which is helpful if you want some seasonally appropriate inspiration.
I soon discovered there are a few big hitter styles which are very popular with the sewing community just now so I’ll start with their details and then follow with all the other suggestions which came in from you via comments on my Sew Over 50 post in October. Whenever possible I’ve given the maximum size available, or bust/hip measurement which were correct at the time of publishing this post.
I’ve recently finished a Sienna Maker jacket, I’ve sewn the short version, view C
Lori @girlsinthegarden.sews also made a short Sienna Maker in this lovely plum-coloured twill. She used bias binding throughout to finish the seams
Merchant and Mills-Ottoline: simple boxy shape with interesting seam lines and two-part sleeves. Fits up to 45” hip
@grannylindasewing made a dark red denim OttolineI made this Ottoline in 2020 as a trial run and it’s been in use ever since.
Friday Pattern Company-Ilford: a simple unisex shirt, or shacket, with lots of customising options and fits up to 62”-63” hips
Michelle @sew.sandbox has made herself a natural-coloured soft flannel Ilford shacket, This pattern has been a hit with the sewing community ever since it came out
Sew Over It-Sorrento: a quintessential jeans style jacket with lots of seams and a slightly fitted shape. This pattern is included in the eBook Summer Dreaming and will fit up to bust 57”
Jen @jenlegg_teescreatives is a serial jacket maker so take a look at her profile for some seriously joyful sewing inspiration!
Alina Sewing and Design Co-Hampton Jean Jacket: another traditional jeans jacket which looks stunning in denim but could be a great scraps buster because of the smaller pattern pieces. Maximum bust 44.5”
@sarahguthrie_stitches has made quite a number of jackets including this floral Hampton so I would definitely recommend a look at her profile
Simplicity Mimi G style #8845 a traditional jean jacket with size options for women/men/teens fitting up to 46-48” bust/chest
Anita @anitabydesign always looks fabulous and this white/red combination is no exception
Wardrobe By Me-Canvas: workwear inspired with a casual boxy fit, plenty of pockets! Fits bust 50” Hip 53”
Byrd @yogabyrdsews helped to test the pattern for the Canvas jacket before its release. You can hear Byrd and Molly chatting to Sew Over 50 guests on the #So50Live podcast too
@soozcreates has sewn a scrap-busting flannel West End (and I’m definitely here for the red DMs!)
Seamwork magazine-Audrey and Rhett: Audrey is a traditional jean jacket with lots of seaming and pocket details, Rhett is a simplified version with a similar silhouette, both fit up bust 54” hip 58”
Cathy @ohsewcathy has made a Rhett jacket in sturdy denim
Grainline Tamarack: a simple shape but extremely popular because of it’s quilting possibilities. Sizes up to UK 30 (US 26) up to hip 58” The Grainline Thayer would also fit the bill but with more pockets.
The Sewing Revival-Mallard: a classic single-breasted silhouette which features a collar and outsized pockets with flaps. Fits bust up to 47”/hip 50”
Papercut-Stacker: a utility button-up in a cropped boxy fit, fits up to 46.5” bust
Butterick #5616: another popular pattern but you’ll need to look beyond the awful sketches and photos on the packet, the line drawings will give you a far better idea of the possibilities. Fits up to UK 22(US18) no measurements given
Style Arc-Adelaide: simple silhouette with various pocket/cuff/options plus a full lining pattern too. Fits up to bust 58” hip 61”
Pauline Alice-Ninot and Ayora: Ninot is a boxy shape with a Peter Pan collar and welt pockets, fits up to bust 42.5” whilst the Ayora is a short reversible quilted jacket and fits up to bust 47”
Itch to Stitch-Causeway: a bomber jacket with elasticated hem and princess seams which can also be made fully reversible. Fits up to bust 49.5” depending on cup size
Aime Comme Marie-Moderne: a French brand, this is an adaptable loose shacket style which will fit up to bust 52/54”
Sew Different-Swing jacket: this is a relaxed throw on jacket with no fastenings, there are large pockets incorporated into the front diagonal seams. The largest size will fit up to a 50” bust/52.5” hip
Helen’s Closet-Pona: another softly tailored jacket with no fastenings, it has wide lapels, patch pockets and roll-back cuffs. Fits up to bust 54”
Deer and Doe-Lupin: a short jacket with back yoke and waistband, welt pockets and a draped collar. Fits up to 45” bust
Fabric-Store.Com-Paola: a free PDF pattern if you register, it’s workwear-inspired with a straight boxy shape, 4 pockets and flat fell seams. Sizes up to US 28/30 (no measurements given)
Love Notions-Metra: another soft blazer shape with shawl or wide lapel options, princess seams with welt pockets. This pattern is intended for stable knits and will fit up to bust size 57.5”/ hips 59.5”
Pattern Union-Felix: this is more of an edge-to-edge French style jacket than workwear, it can be made in 3 different lengths and will fit a maximum bust size of 54.5”
Tessuti-Ines shirt: this shirt pattern would translate well into a jacket simply by using a weightier fabric. Fits up to UK 22
Tessuti-Lyon jacket: a semi-fitted ‘cardigan’ style which is ideally suited to boiled wool. Also fits up to UK 22
McCalls #7729 another traditional jeans jacket with lots of ideas for customisation, fits up to UK 22
Fibremood-Madou: an adaptable loose-fitting shirt/jacket pattern with a wide size range fitting up to 57.5” bust
Cashmerette-Auburn jacket: a classic short length single-breasted blazer specifically designed for the fuller figure. The Princess seams help to give an excellent fit for up to 62” bust
Patchwork and Poodles-Patchwork chore coat: this jacket is specifically designed to make using pre-quilted fabric and as such is a simple shape. It is relaxed fit rather than oversized. It can be made up to bust size 56-58”/hip 58-60”
So there you have more than twenty suggestions which came directly from the followers of @SewOver50, there are undoubtedly many other suitable patterns, in fact there were several that were suggested which I could not trace so I assume they are now out of print or discontinued. I’ve given you descriptions and links for every pattern rather than loads of individual images so click on the links to see what each one looks like. Don’t forget to check if there’s a hashtag for the pattern too, if so there will be plenty of inspiration to be had from that.
If you sew any of the patterns here make sure to include the #So50Jackets hashtag as well as #SewOver50 (@SewOver50 in Stories) A lot of the companies mentioned here will acknowledge our existence but several resolutely do not (presumably run by immortals?) I found it interesting that so many of your suggestions are now from Indie pattern companies and not the Big Four as some might expect. Times change rapidly and we are moving with them, I think it’s proof that whilst we may be a little older we are still happy to keep up with trends in fashion whilst doing it very much our way. SewOver50 will continue to push for greater recognition of older sewers and makers at any opportunity because we know we all have something positive to offer the home sewing community as a whole.
Simplicity have long been one of the most familiar big names in the home sewing paper patterns market but many of us are now choosing to use PDF patterns instead for a variety of reasons. Simplicity have recently decided to dip a toe into the waters and release a small collection of patterns as PDFs for the first time.
I was first invited to try one of this new range of PDF patterns way back in high summer but for a variety of reasons it’s taken until mid-October to get completed.
Simplicity have released a range of ten basics which are available now from Sew Direct including several tops, a skirt, a dress and a jumpsuit, plus two children’s patterns and a free clutch bag pattern.
I chose the tie-front robe jacket SP110 which appealed to me as a cover-up in place of a cardi or sweatshirt and, because it was July at the time, I picked a pretty, drapey Atelier Brunette viscose crepe in a pale ivory print kindly provided by Minerva. The robe jacket is a very simple silhouette with a wide grown-on 3/4 length sleeve, the neck is finished with a band and the tie waist is elasticated across the back.
For me, it depends how many pages a PDF has whether I print it myself or send it away (my usual cut-off is anything over 30 sheets, more than that and I’m not keen on the printing and assembling) However, we had been experiencing postal strikes here in the UK and I needed to get started so I printed at home this time. I think the paper in my printer was a bit out of alignment because not all the pages were printing as accurately as they should have been but fortunately I could see what had gone adrift as I assembled the pages and was able to rectify it. Make sure you print the test page and check carefully that all borders are present and accurate, don’t simply check the test square measurement and wander off into another room while it’s all printing out… With A0 printing this shouldn’t be an issue.
The pattern includes all sizes from UK6 to UK26 (up to 48” bust) which are broken down into two size bands (there isn’t a layering option to isolate which sizes you choose to print unfortunately) The robe jacket consists of just six simple pattern pieces.
The instructions sheet/booklet design is attractive and uncluttered with clear diagrams and straightforward step by step instructions. For the more novice sewer there is a glossary which includes all the sewing terms that will be used throughout, and a page explaining pattern markings. This being a US-originated pattern, all the seam allowances are only in inches so you may want to write your own metric equivalents on the page somewhere before you start, to avoid confusion.
snipping the curved underarm seam means it sits more smoothly without puckering when it’s turned throughpulling up the gathering stitches turning through the front ties using my old school ruler! I joined two pieces of elastic using the 3-step ‘elastic’ stitch on my machine.two different methods of pulling the elastic through, either using a bodkin or using a safety pin with a piece of masking tape to prevent it from opening accidentally inside the channel.All finished
This is a quick and easy make, not much more than half a day probably, and everything comes together well. I thought the instructions and diagrams were clear, well explained and thorough without being over-complex. Overall a relative beginner should be able to manage this pattern. I like to print my instructions in booklet form but I should have increased the font size a little as I struggled occasionally to see the diagrams. I think the diagrams are actually very good, I simply didn’t print them large enough. If you are reading them from a tablet or lap top then this isn’t so likely to be an issue.
My only ‘problem’ now is that I have a summer garment as we head into autumn/winter. I intended it to be a light cover over summer dresses and tops so I’ve tried to style it for the season as it is now. I made a UK14 but possibly should have gone up a size, I feel self-conscious about how it looks around my midriff. It falls exactly on my natural waistline (I’m 5’5” tall) rather than above it like the models who are probably 5’8”-5’10” minimum. Hey ho, I didn’t get the tall gene but I did get the yoyo weight one instead! Basically, I’m pleased with the garment overall but less pleased with how it looks on me just now. I’m determined to get use out of it though but it will probably not be much before next spring.
I have a small quantity of the fabric left so, if there’s enough, I may consider adding it to the bottom under the waistband. This shouldn’t be too difficult because the waistband is straight and it would then give a little peplum which I might feel more comfortable with. It wouldn’t be too difficult to add a longer skirt to turn it into a coat as an alternative.
Being a PDF means you can buy the pattern to use immediately, and all the others in the Simplicity PDF range from Sew Direct. I was paid a modest fee for my pattern review and generously provided with the fabric to make it from Minerva. All views expressed are of course my own.
This post was originally written in January 2021 as a Minerva post for their recently completely revamped their website. I didn’t publish it here at the time and I’ve now sewn another pair of Nina Lee Portobello trousers so I thought I would share my thoughts. I have a paper copy of the pattern but it’s possible that it is now only available as a PDF, unless you can locate a copy somewhere.
I had chosen this interesting reversible woven jacquard fabric in black/cream because I was attracted to the random wavy stripes. When it arrived I found that they ran across the width of the fabric not down the warp so I had to bear this in mind when I cut them out. Fortunately, at 150cms wide with a nice firm selvedge, I didn’t need to alter my plans because I could cut them across the weft grain instead. I intended to make a pair of Nina Lee Portobello trousers and I thought this fabric would look good in this wide-legged style, they have 3 front pleats, side pockets and a centre back zip. I opted to use the black as the outside but I could have used either side of this fabric, or both sides at once to make a contrast.
I folded the material carefully across the width matching the selvedges to each other so that it wasn’t twisted and then pinned the front and back pattern pieces on, ensuring they were at a right-angle to the selvedge on the weft rather than the usual warp grain line. To mix things up a bit I cut two of the pocket bags on the normal grain so that the stripes ran crosswise, plus the remaining two pocket bags in a scrap of bright pink lining fabric.
The fabric was best suited to garments like trousers, skirts, structured dresses, jackets or formal business-type wear although how much call there is for that just now I’m not sure. It doesn’t have much drape but I decided it was still suitable for the Portobello trousers.
The fabric sewed well although I think because I cut it on the cross-grain, there was quite a lot of fraying so I’d advise overlocking all the edges singly before beginning construction.
The style is close-fitting on your natural waist line so the instructions advise choosing according to your waist measurement and go up a size if you’re in between sizes, it’s almost always simpler to take something in that to let it out. The fit over the hips is very generous but if you have an extreme difference between your waist/hip ration then it’s worth double-checking before cutting out. I fell between a UK 12 and 14 so I went with a 14
I traced off the pattern and it went together well, it’s a very simple pattern with clear diagrams and instructions. I ignored the waistband pattern piece because I chose to use an interfacing product called Fold a Band which is perfect for straight waistbands as it gives exactly the right seam allowances and folds. After checking the fit without a waistband I worked out how long my band needed to be, including an overlap and seam allowances, which I then cut in fabric the same width as the Fold a Band rather than using the pattern piece. Fold a Band comes in black or white, and medium or firm weights, depending on your fabric type, and makes a finished width of 2.5cms once it’s sewn on. This is a fairly narrow finish which personally I think is just right. Once I had ironed the interfacing to the fabric I overlocked one long edge, this would be the one to the inside of the finished garment. Pin and stitch the un-neatened edge right sides together to the waist, you could add a couple of useful hanging tapes to the side seams at this point too. Make the turnings at the ends and then you can turn up the band in the usual way and slip stitch it by hand or sink stitch from the front to secure.
Finally, after one last check of the fit, sew on a fastening or make a buttonhole with matching button. Lastly, try them on and turn up the hem to your chosen length, I overlocked the edge and made a 5cms deep turning which I slip-hemmed in place.
The finished trousers, having a deep hem on a style like this gives them additional weight so that they have the casual look I was after.Look at that lockdown hair!!
Since making the black and white Portobellos I have recently sewn a new fuchsia pink crepe pair. The very inexpensive fabric was bought from Walthamstow market late in 2019 with the intention of making wide-legged trousers but they didn’t actually get cut and sewn until October 2022.
I urgently needed a project to sew at the Herts Sewcial with about 15 minutes before I had to leave the house. Initially I was flapping around thinking of all the garments I wanted to sew here and now but then I remembered I had suitable fabric along with the good intentions to make another pair of Portobellos. The pattern was already traced and I just had to locate the fabric but I managed to grab everything I needed (an orange zip but no one would see that!) and rushed out of the house!
There wasn’t a lot of space to cut out but with plain fabric and no print to allow for it didn’t take too long.the view from my seatI used Fold-a-band again, it’s brilliant for straight fixed waistbands.Pink and orange are complementary colours so that’s ok…I popped in a label by Little Rosy Cheeks tooherringbone hemming in front of the telly.
I was pleased with the finished trousers, I think the unusual vertical stripes are striking and the wide leg is very comfortable to wear. They were a bit baggy over the bum though but I think taking them in significantly would have altered the overall look of the style, I’m not sure. Looking again at the back leg pattern piece I think it could be overly generous compared to the front, the darts might need to be a little longer, so I might make some changes on the next pair (I didn’t, because I forgot that I’d written this comment!)
Heading to the autumn Knitting and Stitching show in my new trews and the LB Pullover by Paper Theory
I’m very happy with the new pink pair, even though they weren’t high on my list for Saturday. The bright colour will bring me a lot of joy when I wear them and I’ve always loved that Katharine Hepburn 1940s or ‘Brideshead Revisited’ insouciant look. I’m not sure I’ve personally achieved that look but hey ho, that’s never stopped me yet.


