Mary Quant is a name which is synonymous with British, and world, fashion in the 1960’s and 70’s. She is credited with pioneering miniskirts (although these were almost certainly originally by high-end French designer Andres Courreges, she popularised it and brought it to the masses) along with youthful Vidal Sassoon ‘5-point’ haircuts, and brightly coloured tights and accessories, all things that were a world away from the stuffy, old-fashioned clothes that young people were wearing up until that point, looking like younger versions of their parents.

She created a new and exciting fashion ‘scene’ that was fun and liberating, and which meant that young women in particular could wear what they wanted. The clothes were affordable and accessible although initially they were only available from her two London stores named Bazaar. She made them in bright colours reminiscent of children’s clothing, and often in ‘easy care’ modern synthetic fabrics such as Courtelle and Crimplene which were being developed following the end of the Second World War. Initially the garments in her shops were made in very small numbers using adapted Butterick home dressmaking patterns but this had to change rapidly with Quant’s increasing success.


A new retrospective of Mary Quant’s work has just opened at London’s V&A museum and it’s a fascinating overview of a twenty-year period of her work. During this time, she embraced a post-war boom in shopping and media marketing which resulted in mass production and export of her clothes all over the world, in a way which challenged the dominance of Parisian couture. She changed fashion with fun, edgy clothing that helped to modernise and redefine and which she promoted with high-energy fashion shows unlike the sedate shows that had gone before. Her clothes were being worn by women of all backgrounds, from celebrities and professionals, to mothers at home with young children. She developed ranges of underwear, hosiery, accessories, shoes and make up, even dolls, which often sold for not much money and so were available to just about anyone. She was at the forefront of mass-production of clothing and her garments were manufactured for over 30 years by Steinbergs in Pontypridd, Wales.


Her designs helped to sustain the British textile industry in the difficult post-war years. In 1967, for example, she used stretch-towelling and velour which allowed freedom of movement and comfort in ‘loungewear’, a mode of dress we just take for granted now and can’t imagine living without.

She also embraced a new type of wool jersey which was bonded to acetate fabric, making it more stable and could be dyed many bright colours and she exploited to the full with her iconic jersey minidresses.


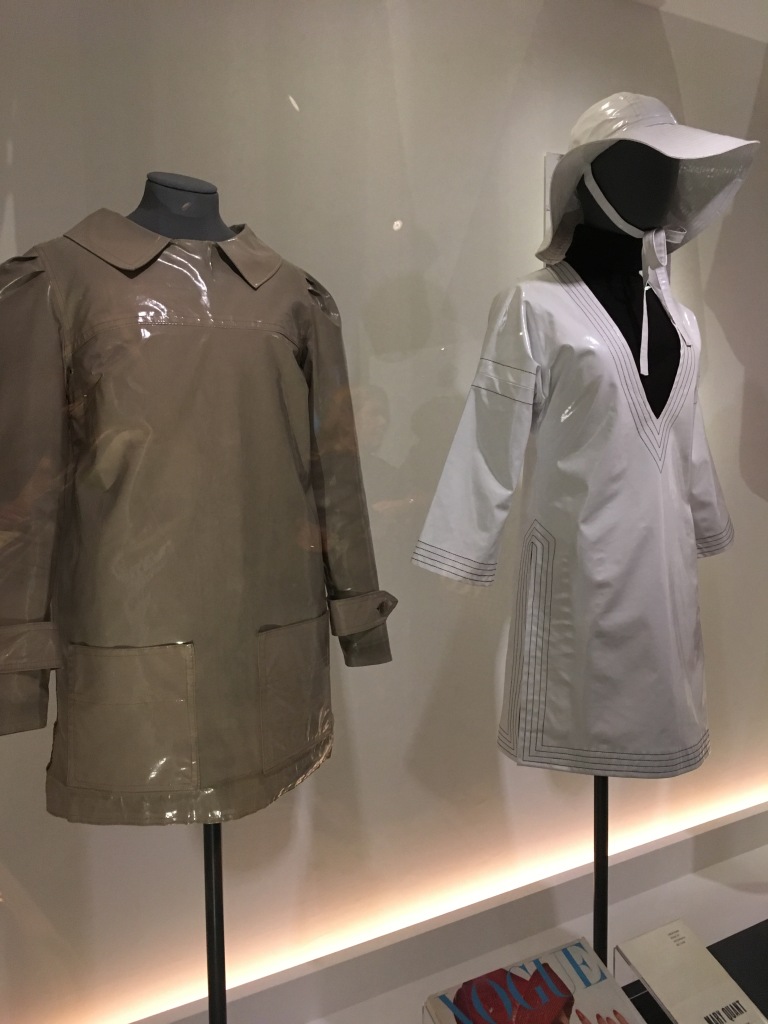
She gained a reputation for reinventing tired products such as raincoats and sewing patterns. Her own initial experiments with PVC rainwear weren’t that successful because the seams were difficult to sew on standard sewing machines and they leaked so Quant quickly realised that she needed to work alongside long-time manufacturers of waterproof clothing to learn from their experience and specialist equipment.


In 1964 she signed a deal with Butterick patterns, the first British designer to do so, and this enabled home dressmakers everywhere to recreate her most popular styles in their own way whether it be in luxury fabrics or on a tighter budget. The first such pattern to be released was the iconic ‘Miss Muffet’ dress, a trademark simple shift with a pretty scalloped collar. There is a lovely original example on display made in 1964 by Sheila Hope in a fine Liberty wool.


Mary Quant also collaborated with chemical and fabric manufacturers Courtaulds and ICI to bring designs of Courtelle and Crimplene fabrics to a younger, trendier audience. Crimplene, which is a polyester-based fabric with easy-care properties, had fallen out of fashion by the 1970s in favour of other better-ventilated and lighter-weight fabrics so she was commissioned by ICI to rescue it’s fading image. It was possible to buy Crimplene in over 500 UK stores at a cost of about £3 per yard (the equivalent of about £23 today)
Many items on display were loaned or donated by ‘ordinary’ members of the public after the V&A put out a request for such items with the hashtag #WeWantQuant. There are interesting photo-montages with people’s memories of owning, wearing or making their own Mary Quant clothing, I particularly liked the quote from Sheila Nicholson, “I horrified my Domestic Science teacher by using a Mary Quant dress pattern for my O-Level!”


Interestingly, Indie pattern design company Alice & Co have collaborated with the V&A to produce a free downloadable dress pattern so you can make your own version of a Mary Quant shift with multiple variations giving lots of options to make your own homage to the MQ mini dress, visit the V&A website for more details, and look on Instagram for lots of tester inspiration too.
There are so many garments in this exhibition which could easily be from today, they still look fresh and wearable. This year jumpsuits and playsuits are very on-trend and there are several examples on show which wouldn’t look out of place now.


I didn’t expect to enjoy this exhibition as much as I did if I’m totally honest, I’m much more fascinated by the techniques, beautiful fabrics and appeal of couture but there was lots to see, along with interesting archive film clips and reminiscences from former Quant colleagues and collaborators. If you decide to take a trip to London any time before February 16th 2020 this would be an excellent way to spend a couple of fashionable hours.
Until next time,
Sue